Summary: Outlook error 0x8004060c basically make the Outlook mailbox inaccessible and at times also disrupt the communication. This article will help to discover the ways through
which this error can be solved and at the same time fixed for sure.
MS Outlook is a useful email platform which many organizations are using these days due to its simplified user interface and other friendly features. Microsoft is trying to improve the Outlook by getting away with the inherent bugs which at times affect the very functioning of the application.
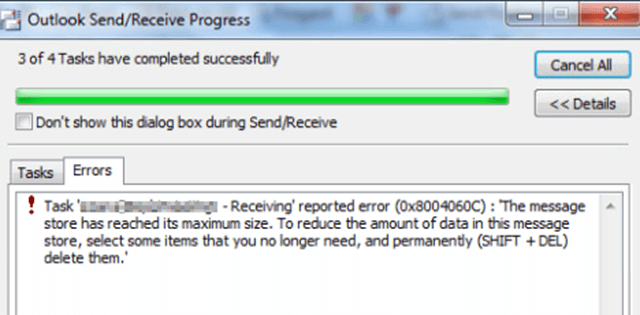
There are the numbers of issues faced by the professionals while using the email platform, but the most notorious issue when a user tries to send or receive emails through the exchange server.. You must have seen the following messages in the dialog box.
-Task “Microsoft Exchange Server – Sending” reported error (0x8004060c): ‘The message store has reached its maximum size. To reduce the amount of data in this message store select some items that you no longer need and permanently delete them.’
-Task “Email Address- Sending and Receiving” reported error (0x8004060c): ‘Unknown Error 0x8004060c.’
-Task “Microsoft Exchange Server- Receiving” reported error (0x8004060c): ‘Unknown Error 0x8004060c.’
This error is surely the reason behind many failed email communications. It can be fixed with the help of the self-executory steps and at the same time may require the support of a third party software. However, before fixing this issue it is important to know the reason behind it. Many professionals suggest following reasons for the occurrence of Outlook Error 0x8004060c:
So it can be clearly inferred that there may be many reasons which are responsible for the occurrence of Outlook Error 0x8004060c. Thus, before moving to the resolution users must know how to technically handle the situation.
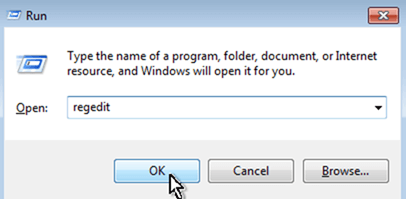
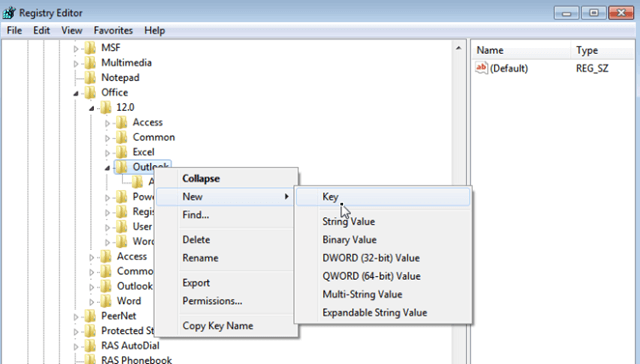
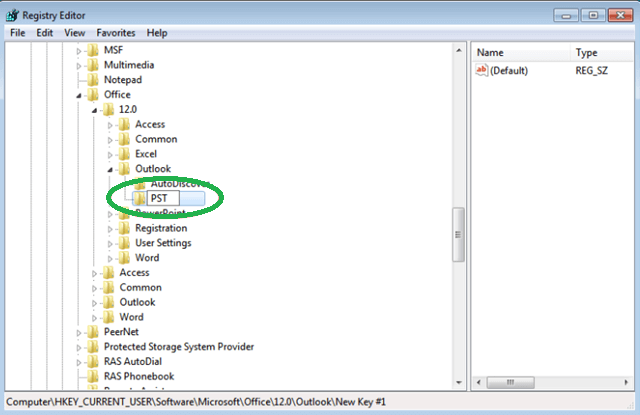
To resolve the error (0x8004060c) manually, many simple steps can be taken into accord. It includes the knowledge of location of registry files, methods to reduce the OST and PST file size and file size limitations.
The issues related to Outlook Error 0x8004060c can be resolved in following ways:
These solutions are explained as follows:
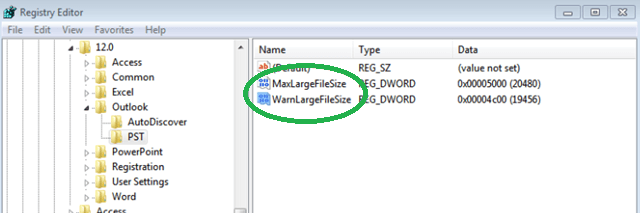
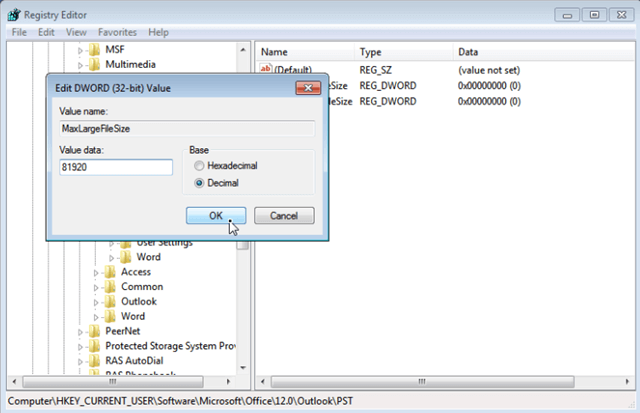
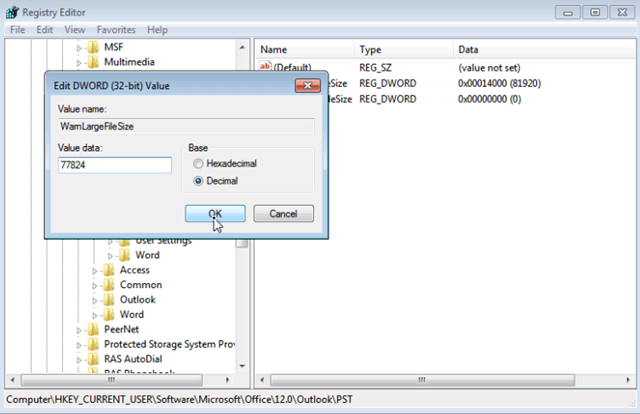
To enhance the Outlook message capacity ,the Windows registry limits must be enhanced. To do so user has to undertake the following steps:
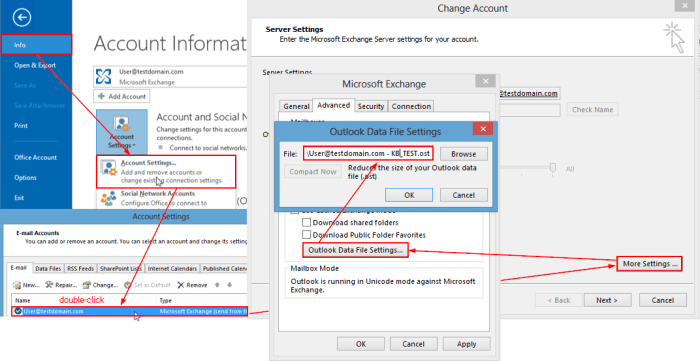
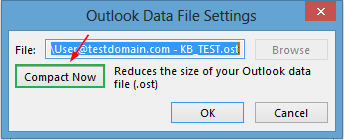
Before compacting the size of OST/PST files, user must check the Outlook version they are using. For Outlook 2007 users, open the Tools menu, while Outlook 2010 users must open the File Tab on the ribbon click Info and Choose the Account Settings.
To recreate OST files user has to follow these steps:
Note: Users can also try recreating the .ost file in case the file is corrupted by deleting the file from its location (find it through Account Settings in Outlook or directly going to C:\Users\Username\AppData\Local\Microsoft\Outlook) and then restart the Outlook application with configured Exchange Server account to create a fresh updated .ost file.
This is the best way to reduce the OST size and eliminate the unwanted mailbox entries.
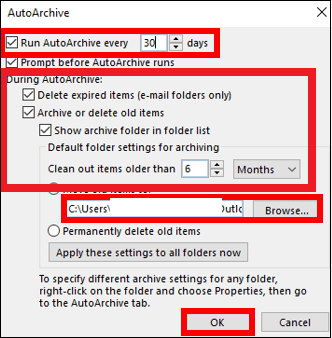
Also, try archiving the old .ost emails based on time filter using the Archive option in the Cleanup Tools feature in the Outlook application to a desired file location. There is a separate AutoArchive feature in the Outlook options using which you can decide the archiving frequency, the saving destination of the old records, deleting actions on old items (delete on every –time or permanently delete old items, etc.
There are chances that the file Outlook Error 0x8004060c may get resolved with such solutions; however, there may be a single percent chance of failure. In such cases the user can take assistance from a reliable third-party tool like OST to PST Tool. To evaluate the performance of the tool, the trail version can be tried that exactly works like the licensed version with varied success rate. Upon satisfaction with its performance user can purchase the licensed version without any delay. Just try once before undertaking the planned execution.
It can be concluded all of these methods have been tried and tested to fix Outlook Error 0x8004060c. so far and have been able to provide the desired results to the users. They have been successfully incorporated in one or the other way and provide great results to the users.
I got this error when I was trying to send emails from Outlook. This post explains all of the possible methods in detail and beautifully so that anyone can benefit from these manual methods without difficulty. These methods help me a lot to fix this error effectively. I thank the entire team for sharing this wonderful article.
I was facing this issue due to connectivity with Exchange Server. After fixing it, I found that my OST file was corrupted. This article helped me a lot. Thank you.
When I send an e-mail to my friend, I suddenly get an error message 0x8004060c. As a user, I began to research manual methods. Then I found a more recent and technical article suggested by different methods that helped me fix this error. Thanks for sharing this article.