How to Setup Office 365 Mailboxes Archive and Deletion Policies?
Email
|
5 min read|
Colton Garcia
|
Updated On - March 18, 2023
Office 365 allows its users to control the features settings as per their need. Archiving data is an important aspect for storage maintenance and security of old data as well. But when we archive Office 365 mailboxes data, it is to be noted that there are certain time limits set by default for those archived emails in a separate folder crossing which the mailbox gets deleted from there permanently.
Let us understand with an example – Suppose, you have deleted about 20 old or unused mailboxes from your Office 365 account and those mailboxes get saved in the archived mailbox. Office 365 has a set retention period for deleted mailboxes, say 3 years. When this period is completed, all the 20 mailboxes in the archived emails will get deleted forever. So, here in this article, you are going to learn how you can manage those retention policies for archiving and deleting of Office 365 mailboxes.
You must know that in Office 365, there is facility to create retention policies with options of some retention tags using which you can manage archiving and deletion of old Office 365 mailboxes items.
Getting started – Setup Archive and Deletion Policies for Office 365 Mailboxes
For performing this action, users must be a global administrator in Office 365 or with the administrative rights.
Note: When any user in Office 365 is assigned the Exchange Online license, a mailbox is created automatically for it with the Default Retention Policy, also known as Default MRM policy with default settings. But users can create and set up a new Retention Policy anytime as per the requirements.
ENABLING ARCHIVE MAILBOXES
Log in to your Office 365 account with the global administrator credentials. First task is to enable the archive mailboxes for Office 365 users. Perform this with the following steps:
- Click on the Admin option and then select the Security & Compliance Center option from right panel.
- Now, go to Data Governance>Archive. All the user mailboxes will get enlisted. Here, select all the user mailboxes using Shift button and then under Bulk Edit option on the leftmost panel, click on Enable option.
- A warning message will appear asking for the confirmation. Click on Yes option to confirm the action.
- All those selected mailboxes will be archive-enabled now.
CREATING RETENTION TAGS
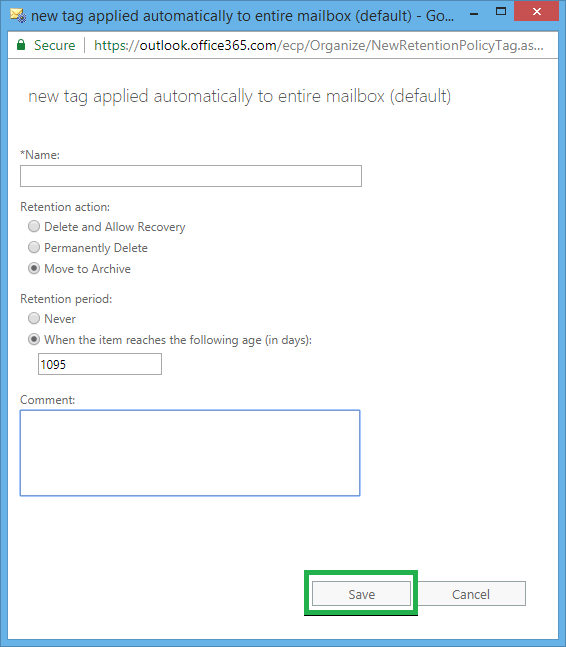
For Archiving- Archiving Default Policy Tag
- Click Admin option in Office 365. Then go to Admin Centers and select Exchange option under it.
- The Exchange Admin Center page will get open. Here, select Compliance Center, and then click on Retention Tags. Click the plus icon and select the option applied automatically to entire mailbox (default).
- In the opened page, enter the details to the new retention tag.
Name: Enter any name for the retention tag
Retention action: Select the option Move to Archive from the given options Delete and Allow Recovery, Permanently Delete and Move to Archive
Retention period: here enter the number of days (as you require)
Comment: It is optional. Add any comment if you want to.
After all these details, click on Save option.
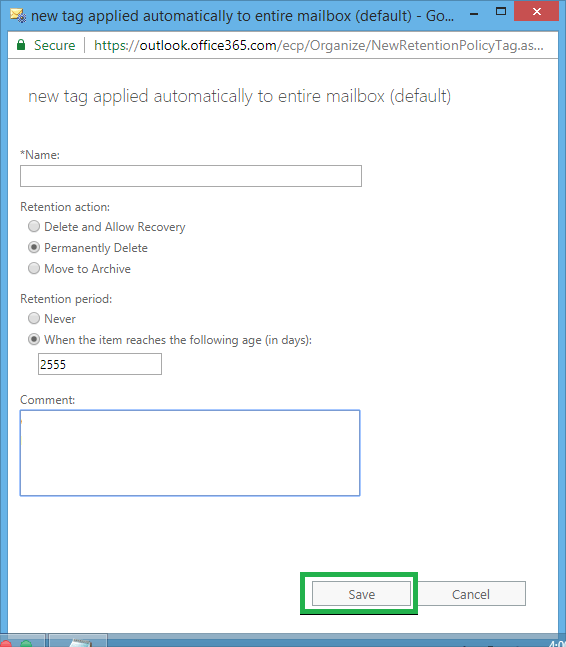
For Deleted Items Folder- Custom Retention Policy Tag
- Navigate again to the Exchange Admin Center in Office 365 as done in the previous step. Then click on Compliance Management and then click on Retention Tags.
- Click on the plus icon and select the option applied automatically to entire mailbox (default).
- In this opened page, enter the details like name, this time choose retention action as Permanently Delete, and enter the Retention period in number of days. You can also add any comment if you want.
- Click on Save option to save the entries.
Similarly, you can select the other option Delete and Allow Recovery from the Retention Action. Here, items will get deleted after a set period of time and has recover option after default set 14 days.
CREATING NEW RETENTION POLICY
- In Exchange Admin Center of Office 365, click on Compliance Center and then select retention policies.
- Click the plus option and the new retention policy page will get open. Here, enter a name. Under Retention tags category, click the plus icon and then select the above created retention tags along with other available tags, if required. Click on add option to add the tags and then click on OK.
- Then review the retention tags to this new policy and click on Save.
ASSIGNING NEW RETENTION POLICY TO MAILBOXES
- Visit the Exchange Admin Center page in Office 365 again. Here click on Recipients and then select mailboxes.
- Select all the retrieved mailboxes (or you can choose selective users) and then on the leftmost side, click on More. Now under Retention Policy, click on Update option.
- The bulk assign retention policy page will get open. Here select the created policy from the drop-down and click on Save.
Note: To verify if the new retention policy is set to the user mailbox, go to that mailbox, click on Edit option and from the mailbox properties dialogue box, click on Mailbox features option which shall display the information related to set Retention Policy.
This will set the newly created retention policy to the user mailboxes in Office 365.Within around 7 days, this new policy will get set to the Office 365 user mailboxes. Also, if you want to save Office 365 data to a secure location, you can try the most effective and efficient third-party solution Convert Office 365 to PST software. It supports all the editions and plans of Office 365 and saves required data to Outlook PST format swiftly.
Final Words
Office 365 includes all scope to manage data within it, for example – retention policies or we can say it as Office 365 mailboxes archive and deletion policies. We had discussed all the necessary steps in the policies set up procedure along with related crucial information for the users’ benefits.