Smartphone users are aware that the system creates some temporary files that occupy limited space unnecessarily. The users delete such files before they grow in size and it keeps the mobile space available. But the Windows users do not emphasize much on removing the temporary files because the space of a windows drive is relatively much larger and there is ample room to install the new software.
Need to remove temporary files:-
User may face the following problems when using Outlook due to Outlook temporary files-
- Disk Space – When users cannot access the Outlook attachments then they receive notification as there is no space within the Outlook temporary files folder. It also happens when a load of attachments has been received in Outlook with time and the temporary file folder space not decrease. User faces the problem and affects the Outlook performance. Then the user needs to delete the Outlook temporary files to fix ‘Outlook attachments unable to access’ problem.
- Security Risks – Sometimes at the time when attachments are deleted, opened and then closed or the Outlook has been shut down accidentally, then a copy of these attachments file get stored at the temporary folder location. If a person with knowledge about this location can easily get the confidential information within these attachment files. To secure these confidential attachments, files or sensitive information from data theft, it is recommended to delete the temporary Outlook files from your system time to time.
But if you do not remove the temporary file then they will increase in size and soon will slow down the system and decrease the space for new software or updates for the existing software.
Remove temporary files in Windows 10
Windows 10 has given total control to the user related to the hardware and software specifications and there is an inbuilt cleanup tool to delete the temporary and junk file from the system. You can follow the steps here;
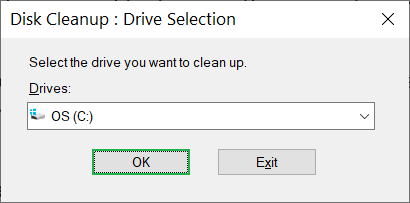
- In the search bar, type ‘disk cleanup’ and open it. It will prompt open the option to select the Drive where you want to run the cleanup. Choose Drive C and click OK.
- The tool will present you with multiple options where you can use the checkboxes to select the folder for deletion. After choosing the files, you can see the total data that you will delete. Click OK.
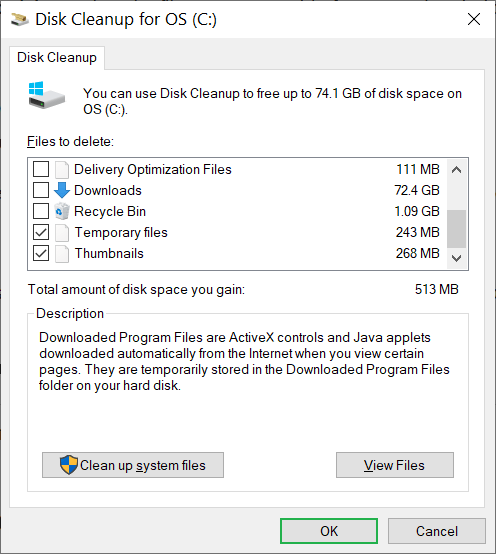
- A pop-up will ask whether you want to delete the file permanently. Click Delete File. It will start to delete the files completely.
The Disc cleanup tool has another option where you can delete more system files and create more space. Click the button Clean up system files. It will open up the same Clean up application where you can choose more folders to clean.

Sometimes, when you have cleared the temporary files, but the Windows is still showing the Low Disk Space error, then it means that the temporary folder is getting filled quickly with the application file used by the Microsoft store. You can reset the Microsoft store, delete the cache file and execute the Windows Update Troubleshooter.
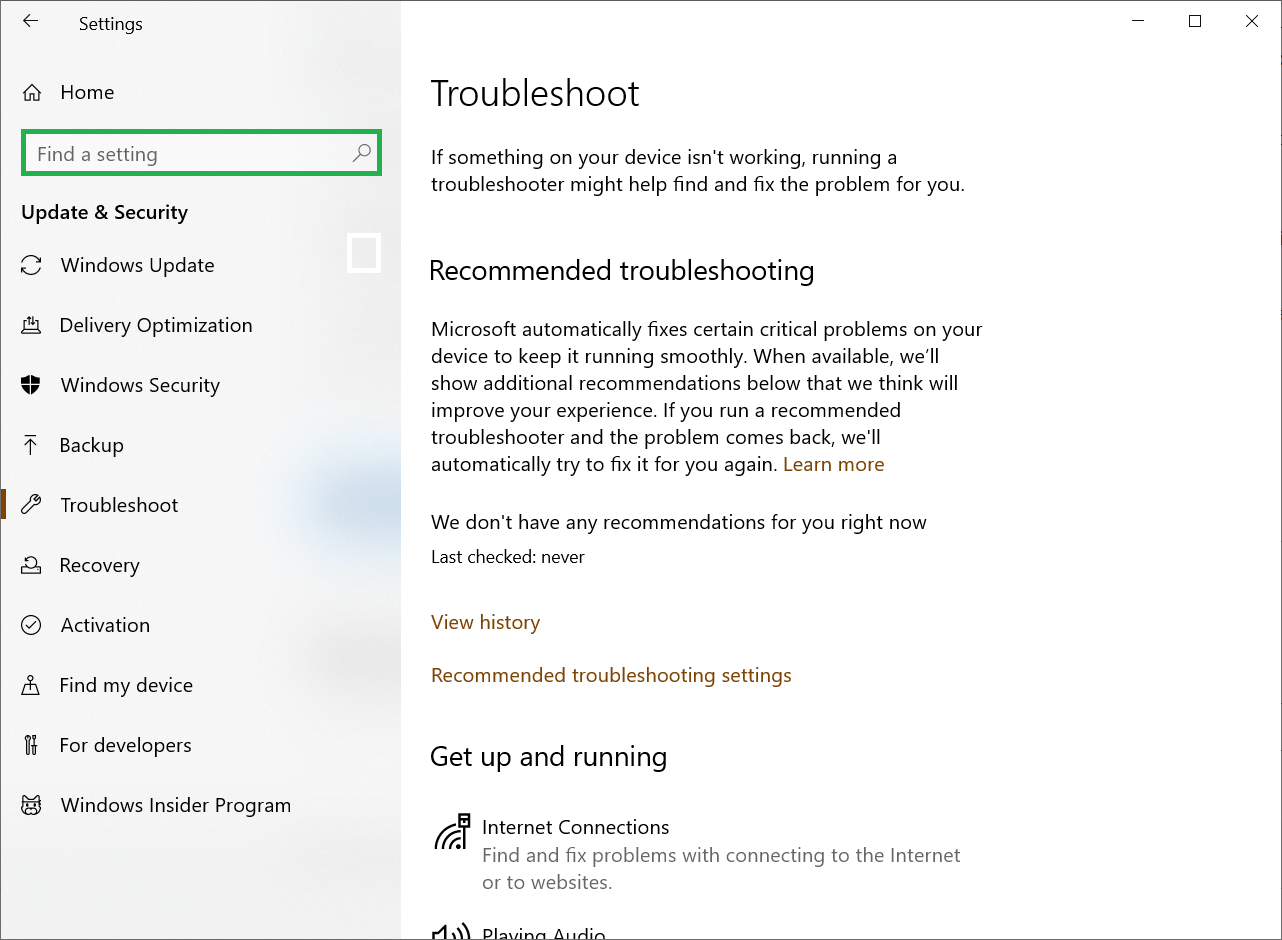
- In the search bar, click Settings, then go to Update & Security and finally click Troubleshooting.
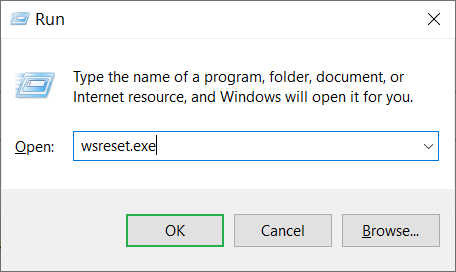
Run the troubleshooter. - To complete the Microsoft store cache cleaning, to run the type wsreset.exe, then it will open a blank command prompt. It will remain open for approximately 10 seconds, but the Microsoft store will open later and the cache will be cleaned.
- To reset the Windows Update, again go to Troubleshooting in Settings, then choose Update & Security>>Troubleshoot>>Windows Update.
Restart the computer and see if the disk has cleaned from earlier.
Remove temporary files through Windows Registry
To get the path address through Windows Registry, you need to open the Run window by pressing Windows+R and type regedit. Then click on OK. Now you will see Registry Editor page on the screen. For different versions of Outlook, the OLK folder path is different which you can get directly from the registry key created by Outlook. Here are some registry keys you have required as per your Outlook versions by following the given paths.
- Outlook 2016-
HKEY_CURRENT_USER/Software/Microsoft/Office/16.0/Outlook/Security - Outlook 2013-
HKEY_CURRENT_USER/Software/Microsoft/Office/15.0/Outlook/Security - Outlook 2010-
HKEY_CURRENT_USER/Software/Microsoft/Office/14.0/Outlook/Security - Outlook 2007-
HKEY_CURRENT_USER/Software/Microsoft/Office/12.0/Outlook/Security - Outlook 2003-
HKEY_CURRENT_USER/Software/Microsoft/Office/11.0/Outlook/Security
Go to the location from the above path and double-click “OutlookSecureTempFolder” key on the right pane to open it. Select it then Press CTRL+ C and copy the file folder path.
After that, press Windows+E to open the Windows Explorer page. After opening Windows Explorer, on the top address bar, paste the copied path and press the Enter on the keyboard. Now you can see the temporary files on the screen. Just select and delete the ones which you want to delete and for permanent removal delete it from the Recycle Bin as well.
Remove temporary files through Temporary file location
If the Outlook is not well configured, the ‘OutlookSecureTempFolder’ field does not exist in the registry. Then there is a way to reach in temporary file folder. Windows Operating System uses the Temporary Internet Files folder as the parent folder for storing its temporary files. It creates a new folder under the Temporary Internet Files folder with a randomly generated name. In this situation, you need to locate this path in a different way as it will not be available through the method discussed above. In the below section, we will provide the path based on the Windows Operating System version:
- For Windows 8 and Windows 10
C:\Users\username\AppData\Local\Microsoft\Windows\INetCache\Content.Outlook - For Windows 7 and Windows Vista Operating System
C:\Users\ username \AppData\Local\Microsoft\Windows\Temporary Internet Files\Content.Outlook - For Windows XP Operating System
C:\Documents and Settings\ username\Local Settings\Temporary Internet Files\Content.OutlookNow, we have provided the default path for every operating system. But there is a small difference according to the version of your Outlook application as well.
How to free Windows space for the latest Windows 10 updates?
Windows 10 brings the latest updates regularly to enhance the windows performance and security. Before installing the updates, Windows checks for the disk space to accommodate the new files.
If Windows does not find the required space for the files, then it will send a message that Windows required more space.
“We can’t install the latest Windows 10 features and security improvements on your PC due to low disk space.”
You can take the assistance of two methods to overcome such a situation. Either you use an external device or free up space on the computer.
Save updates using External Storage Device
- Go to Update & Security in the Settings.
- In the Windows update page, click Fix issues.
- In the Windows Update too, choose the external storage drive from the drop-down menu.
- Click Next and go through the instructions to install the updates.
- After getting a successful installation of the update, remove the storage device securely.
Free up the storage space manually
- Empty the recycle bin.
- In the Downloads folder, delete such files that are no longer needed for any usage.
- Follow Settings, then System, and Storage.
- Delete the temporary files.
- Come back to the Windows Update page and check if it still requires more space for the updates.
- If the message persists, then uninstall some applications that are taking more space in the C drive.
- Transfer the files to any external storage drive temporarily.
- After making enough space for the updates, restart the Windows, and install the updates.
Conclusion
Windows have limited space and you need to maintain the size of the drives at an optimum to bring the new files and better the performance. If you are unable to delete the older and unwanted files from the disk, then you should use a professional Windows Recovery software that can allow you to save the important data and leave the unimportant files for deletion.