Video stuttering can be highly frustrating and it is one of the most common problems faced by the users while watching videos online. It can ruin the viewing experience and it can be very annoying. While many users try to find a solution to this problem, many others are unaware of how to fix this problem. This article will tell you how you can fix this issue.
We all must be aware that Video streaming is a widely used service. It is pretty much everywhere. Nowadays, it has become a necessity to stream video content. It has become less of a luxury and more of a necessity. Also, video streaming is a great way to reach out to your customers and it can also get them hooked to your brand. But there are times when you try to stream a video, and it starts to stutter or glitch. A bunch of vertical lines will appear on the screen while you are watching it. This can be pretty frustrating, especially if you are streaming videos daily. So, now let’s further find the leading causes behind these issues.
Causes Behind Video Stuttering and Glitching Issue
Have you tried playing your favorite video in Windows Media Player and noticed the video stuttering and glitching? When you try to play the video, the player freezes up and there are artifacts on the screen. In some cases, you might also notice the video missing frames. The reason behind this problem is Windows 10. For better understanding, we have also listed a few causes below.
- When there is an outdated media player in which you are trying to play the video.
- Due to virus attack or malware intrusion on the system.
- If the windows are updated with the latest version.
- In case of incorrect settings of the system or media player.
- If there is corruption in the video file.
- System configuration issues.
Free Methods to Fix Video Stuttering & Glitching
Video Stuttering & Glitching issues can be fixed by different approaches. Here we will mention each of them with entire working steps. Try each troubleshooting technique to get rid of the video stuttering and glitching issues.
1. Update the Graphics Driver
The video playback issues can appear due to an outdated display driver. Thus, updating the display driver can be beneficial in fixing the video stuttering & glitching issues. Besides, you have to boot your system in safe mode and then continue with the below steps to update the display driver.
- Open your system or PC and search for Device Manager.
- After that, open the Device Manager.
- Now, expand the Display adaptor option from the device manager.
- Right-click on your installed graphics and select Uninstall device.
- After successful uninstallation, restart your system or PC.
- Now, check for updates from the Windows update settings.
- Here, the Windows will automatically update the recent display driver on your system or PC.
- After the update, restart your PC.
2. Install all the Windows Update
Updating all the required updates of Windows will also fix Video Stuttering and Glitching Issue on Windows 10. Here are the steps to update the available updates of Windows.
- Open your PC and press the Windows icon.
- In the Windows search bar, search for Updates.
- Click on Check for updates from the list.
- Again tap the option Check for updates from the right-hand side of the opened wizard.
- After the final update, restart your computer and check for Video Stuttering and Glitching issues.
If still the video playing issues appear, then move to the next troubleshooting techniques to fix video stuttering and glitching issues.
3. Set the Power Management Setting to Default
It has been that the changes in the functionalities of the Power management system cause various interruptions. Due to the changes in power management systems, it might be possible to encounter video playback issues. Therefore we recommend changing the Power management system to its default. Here are the steps that you have to follow for the above tasks.
- Right-click on the battery icon from your system or PC.
- From the displayed pop-up, choose Power Options.

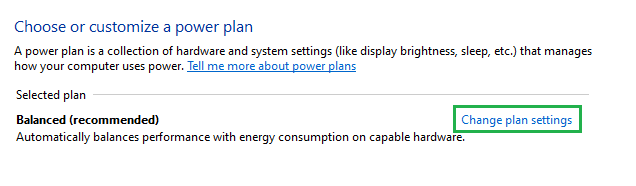
- Power option wizard will open up. Click on the Change plan settings.
- From the Edit plan settings wizard, tap on the option Restore default settings for this plan.
- Now, it will ask for confirmation. Click Yes to continue.
The above listed are steps to make the Power management system default. After accomplishing this troubleshooting, restart your system or PC and check for the video stuttering and glitching issue on Windows 10.
4. Check for Wallpaper Setting on Windows 10
When a user has enabled the slideshow on their Windows 10 Operating system, then it is quite possible to miss the video frame whenever the slideshow changes. Thus, changing the Windows 10 wallpaper setting can get rid of the video not playing issues. Below are the steps to follow for changing appearance settings.
- Open your PC and from the Windows search bar Background Image Settings.
- Now, you will find the background setting option.
- Here, click on the background drop-down & choose Picture or Solid color.

- Select your picture/solid color.
5. Change Google Chrome Browser Settings
Sometimes, the hardware acceleration feature of Google Chrome causes the video stuttering issue. Hence, enabling & disabling hardware acceleration can fix video stuttering and glitching issues on Windows 10? Follow the below steps to execute the process.
Note: Enable if it is disabled, disable if it is enabled.
- Launch your Google Chrome browser.
- Click on the Customize & Control Google Chrome icon. (Represented by three vertical dots on the right-above side of your browse page)
- After that, select the settings option from the lists.
- Now, press the Advanced option to expand.
- Here, select the System category.
- If you found the option “Use hardware acceleration when available” enabled, then click on the toggle to make it disabled.
- Restart your PC and check for the video issue. If still encountering the same, repeat the same process to make it enable.
In case, if the troubleshooting techniques do not work for you to fix the video stuttering and glitching issue on Windows 10, then there must be chances of corruption in your video files. Therefore, use a third-party utility to repair the video file and get rid of these video playing issues.
6. Professional and Reliable Video Repair Tool
If you’re experiencing video accessibility issues with your site and have completed all possible repair measures without any success, there’s a good chance that the videos have gone corrupt. Corrupt videos will never become playable again until you fix the corruption or the damage to your files. We recommend this video repair tool to improve the quality of these corrupt videos and make them work smoothly.
Conclusion
Video stuttering or glitching on Windows 10 is an issue that you may encounter, especially when you are playing a video on the internet or your local drive. If you have had this problem before, you know that it can be a real pain to deal with. The good news is that there are ways to fix this issue, and in this blog post, we have discussed the best video repair tools for fixing video stuttering and glitching video issues on Windows 10.