The G Suite to Office 365 migration guide is drafted for users who seek an arranged and feasible migration of G Suite content to Cloud destination.
Office 365 cloud platform is high in demand due to its secure, professional, scalable and robust infrastructure. Even G Suite users feel need to migrate to the cloud platform at some point of time. Check out this complete and detailed G Suite to Office 365 migration guide with all important stages and steps.
Manual G Suite to Office 365 Migration
Preparations for Migration
- Creating a Google Service Account and JSON Key
- Visit this link https://console.developers.google.com/iam-admin/serviceaccounts in your Chrome browser and sign in using the G Suite admin credentials.
- Add a new project name and click CREATE option.
- Now, go to IAM & Admin>Service Accounts>Select Project>Create Service Account. Add any Service account name and click CREATE option.
- Click Continue and Done on the next two continual pages.
- Next, click Email for the Service account and then click Edit option.
- From the Service account details page, note down the unique ID on a separate location for further use in migration.
- On the next page, expand the section Show Domain Wide Delegation and select the checkbox saying Enable G Suite Domain-wide Delegation. Add the product name for the consent screen and click Save.
- On the Keys page, click on Add Key option and select Create key.
- Select the key type as JSON and click CREATE.
- The JSON key will be created to download. Keep a track of this file for further use.
- Enabling Gmail, Contacts, Calendar APIs
- Go to this link https://console.developers.google.com/apis/library and sign in with G Suite admin credentials.
- Select the project created earlier.
- Search APIs – Gmail, Google Calendar and Contacts and click Enable option against each of them.
- Assigning access permission of service account for Google tenant
- Open the G Suite admin page and navigate to Security>API Controls>Manage Domain Wide Delegation.
- Click Add new option against the API Clients list.
- On the Add a new Client ID page, enter the client ID created in the Service Account stage.
- Enter the following scopes as it is in the Oauth scopes section.
https://mail.google.com/,https://www.googleapis.com/auth/calendar,https://www.google.com/m8/feeds/,https://www.googleapis.com/auth/gmail.settings.sharing - Click on Authorize for verification of the scopes.
- Creating sub domains for mail routing to Office 365 & G Suite
To Office 365- Open the G Suite admin page and go to Domains>Manage domain>Add a domain.
- Provide the domain name and click Continue and verify domain ownership option.
- Keep a track of this domain for use in migration.
- Login to DNS provider and update the records.
- Follow the same steps for creating sub domain for mail routing to G Suite. Navigate to Domains>Manage domain>Add a domain alias. In this follow this link – https://support.google.com/a/answer/140034 to set up MX records for G Suite Gmail.
- Adding users in Office 365
Provide or create Mail Users for every user in the organization listed for migration to Office 365.
Migration Process with Exchange Admin Center
Once all the above preparations are fulfilled or completed, follow this process to perform G Suite to Office 365 migration through synchronization process using the Exchange Admin Center.
- Open the Exchange Admin Center with administrator credentials.
- Go to recipients > migration.
- Now, click on the New or plus icon and then select Migrate to Exchange Online option.
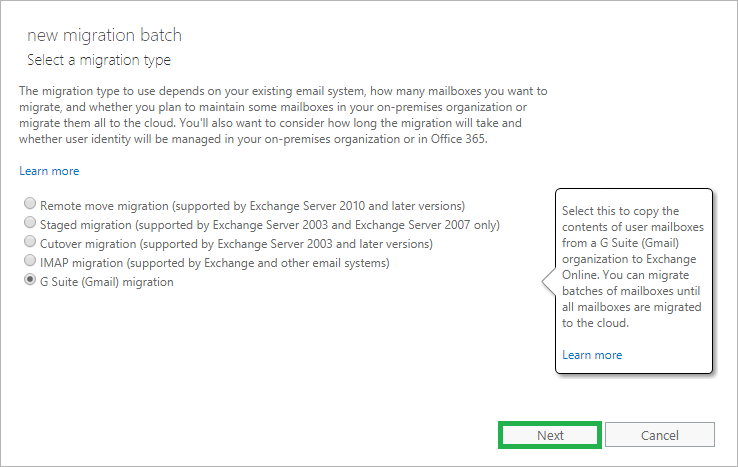
- On the new migration batch page, select G Suite (Gmail) migration option and click Next.
- Users are required to create a source CSV file before the next step with the Email address (primary email address of Office 365 mailbox) and Username (primary email address of Gmail) headers.
- Now, click on the Choose file option to browse and add the created CSV file as described in the previous step. Add the file and click Next to continue.
- On the G Suite (Gmail Configuration) page, provide the G Suite admin email address and test connection between Office 365 and G Suite accounts. Click on Choose File option to browse and add the JSON file (contains private key for service account) downloaded when the service account was created. Then click Next.
- On the Move configuration page, provide the migration batch name, target delivery domain (domain created to route emails from G Suite to Office 365) and click Next.

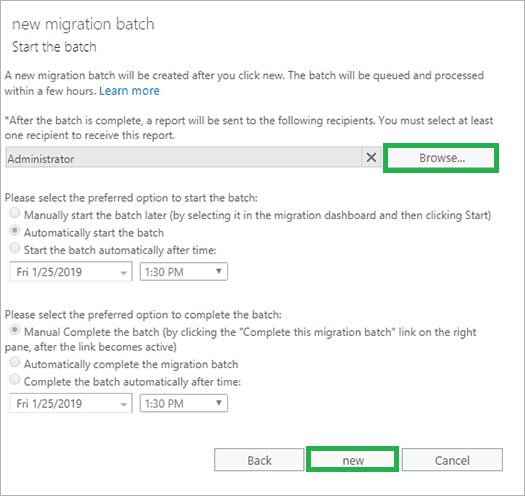
- On Start the batch page, browse and add the recipient to send the report, select the options to start and complete the batch. Then click new.
- The batch synchronization will start. Wait till the status changes from Syncing to Syncd.
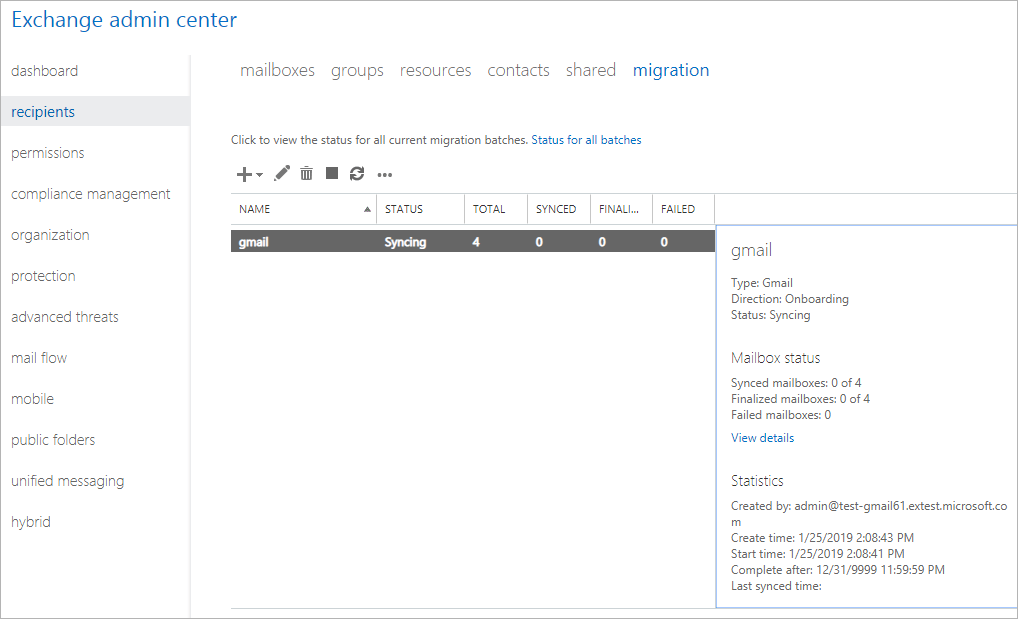
- This synchronization follows incremented migration and ensures migration of newly received emails from G Suite to respective Office 365 mailboxes.
With Exchange Online PowerShell
- First users need to connect to the Exchange Online PowerShell.
- Test connectivity between Office 365 and G Suite accounts using this command.
Test-MigrationServerAvailability -Gmail -ServiceAccountKeyFileData $([System.IO.File]::ReadAllBytes(“C:\\somepath\\yourkeyfile.json”)) -EmailAddress username@xxxx.net
- If the test is successful, run the next command to create the migration endpoint.
New-MigrationEndpoint -Gmail -ServiceAccountKeyFileData $([System.IO.File]::ReadAllBytes(“C:\\somepath\\yourkeyfile.json”)) -EmailAddress username@xxxxx.net -Name gmailEndpoint
- Next, run this command to create the migration batch.
New-MigrationBatch -SourceEndpoint gmailEndpoint -Name gmailBatch -CSVData $([System.IO.File]::ReadAllBytes(“C:\\somepath\\gmail.csv”)) -TargetDeliveryDomain “o365.xxxxx.net”
Enter the path of the CSV file created at the specified space in the above command.
- The batch migration will be started.
Is this native way of migration OK to you?
The above migration process to move G Suite to Office 365 is multi-staged and includes various steps. The user or administrator performing this migration – via Exchange Admin Center or Exchange Online PowerShell should be technically sound to avoid any sort of mistake causing the whole process to start again or creating the data loss condition. These data cannot be migrated using the native solutions – Calendar Reminders, Appointments, Chat message attachments, Calendar Attachments, Tasks, Chats and chat history, Google Groups for Business, Google Categories (i.e., the Google category flags: Social, Promotions, Updates, Forums), Email attachments that are links to Google Drive, etc. Also, a certain amount of patience and time are the primary requirements to complete the process without issues.
So, if you feel these challenging conditions comfortable, then have a try. For other users, we have easier and quicker migration solution for G Suite to Office 365.
Get the best alternative here
The G Suite to Office 365 migration becomes an easy operation if you choose the automated or professional way. We got you the best of all – G Suite to Office 365 Migrator tool that includes minimum steps to achieve instant and efficient migration of complete G Suite content with facility of advanced filters and options along with a smart interface.