The benefits of the Office 365 platform are numerous and you can attach multiple accounts in a single Outlook platform. There can be different mailboxes in your Outlook account that are useful for specific purposes. There can be the primary mailbox, archive mailbox, and shared mailbox, etc. you can create an archive and shared mailbox and move your primary mailbox’s data to archive and shared mailbox.
The shared mailboxes are the common mailbox that many users share in their Office 365 account. When the user of the shared mailbox sends an email to another user, then the user will receive the email from the shared mailbox, not from the sender’s mailbox. You can easily recognize the shared mailbox by its name like contact@companydomain, info@companydomain, complaint@companydomain, share@companydomain
If you have a shared mailbox in your Office 365 and it is not showing in the Outlook, then you may be missing some important emails that need to accessed by fixing this issue instantly.
Cause
- You may be not seeing the shared mailbox in Outlook after you have migrated the on-premises mailboxes to Office 365 and that time not connected to the shared mailbox that has been shared with you.
- Sometimes, you may see an error while looking for the shared mailbox –
Cannot display the folder. Microsoft Outlook cannot access the specified folder location. The operation failed. An object cannot be found. - The cause behind the error may be due to your permission level also. If the Administrator grants the access rights through the Dialog Access, then it means that the Administrator has only shared the default folders like inbox, calendar, contacts, tasks, and notes, etc. and the user can send/receive emails on behalf the account. But it does not mean that the user may include the shared mailbox to his/her Outlook account.
Learn some workarounds to fix this issue
Workaround-1
The Administrator should provide an extra permission level ‘Folder Permission’ to the user on the mailbox folder.
- The Administrator should go to his/her account, right-click it and choose Folder Permissions.
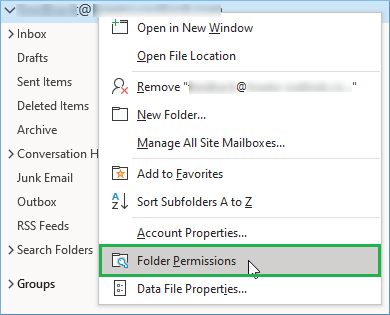
- Go to the Permissions tab, choose the user account with whom you want to share the mailbox, and click the Add button.
- Choose the Permission level and check the option ‘Folder visible’ under the other category.

- Click Apply and then OK.
Once the Administrator has given the required permissions, the receiver can easily add the folder into his/her Outlook account.
- Follow File>>Account Settings>>Account Settings>>Exchange Account>>Change>>More Settings>>Advanced.
- Choose the Add button and input the name of the shared mailbox address of the Office 365 account..
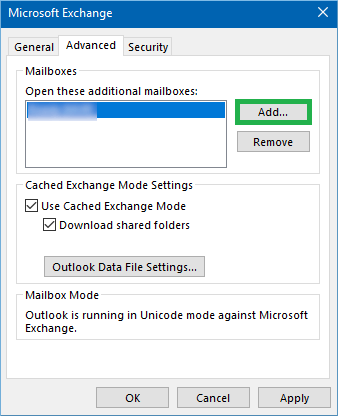
- Click Apply and restart Outlook. Check if the shared mailbox is present now.
If you are still unable to view the shared mailbox, then you need to go through a troubleshooting process in the Outlook.
- Start Outlook, click File and go to Options and click it.
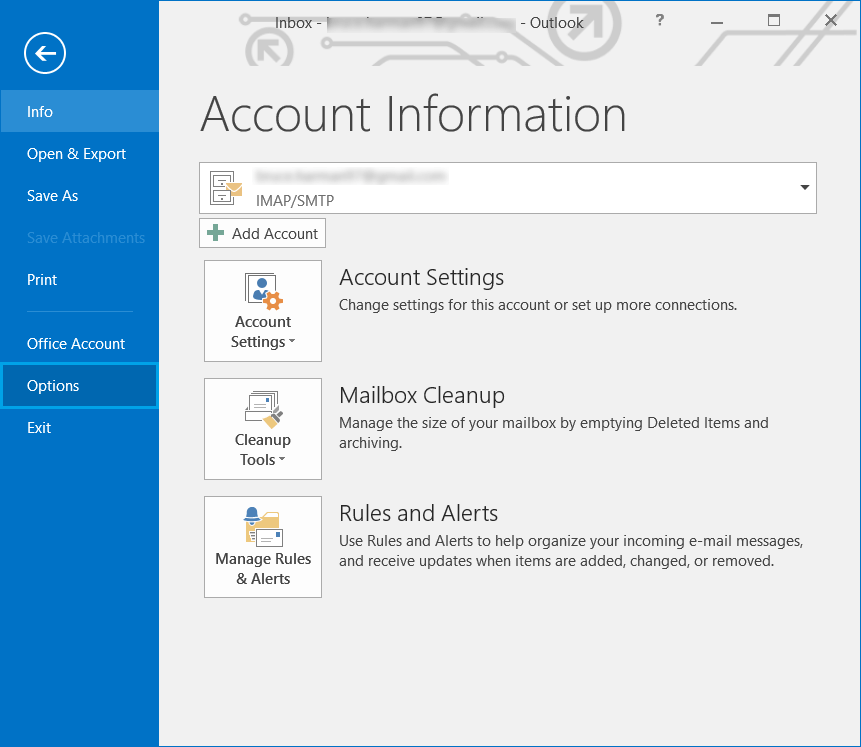
- In the Advanced tab, check the option Enable Troubleshooting logging.
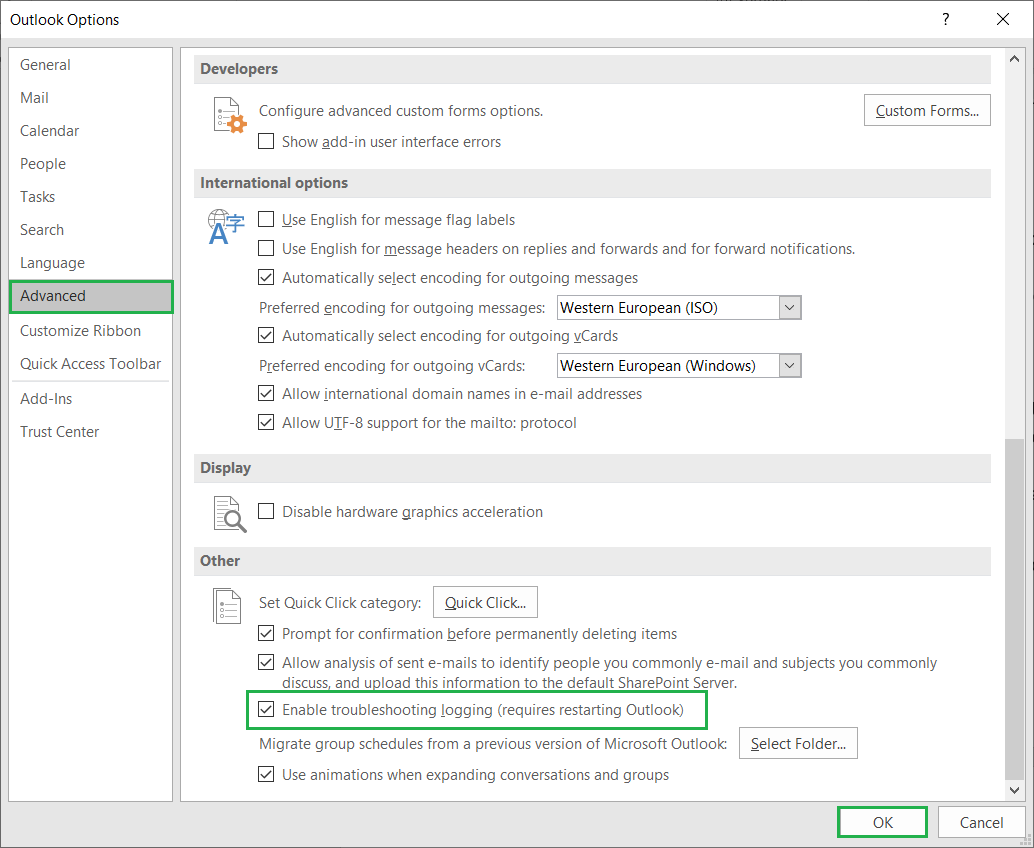
- Go to a temporary folder and check the recent logs that will depict the possible errors for the absence of a shared mailbox. Then you can go to further troubleshooting based on the errors.
Workaround-2
There is another method that is a little bit longer but, you can try it. There is an auto-mapping feature in the Outlook that locates the shared mailbox and adds it to your Outlook account. But the overall size of the Outlook data file gets increases with the data and once you cross the 50 GB limit, then the Outlook may stop taking the data from the shared mailbox.
So, you can disable the Automapping feature and add the shared mailbox like a normal mailbox.
Follow the easy steps below;
- Run the Windows PowerShell on your system as an administrator (right-click the app icon and select Run as administrator).
- First, you need to connect with Exchange Online account by running the command;
$Credential = Get-Credential
Input the Office 365 credentials in the prompt up box.
- Now connect with Exchange Online
$ExchangeSession = New-PSSession -ConfigurationName Microsoft.Exchange -ConnectionUri “https://outlook.office365.com/powershell-liveid” -Credential $credential -Authentication “Basic” -AllowRedirection
- Import the session of Exchange
Import-PSSession $ExchangeSession
- Remove the permissions for the shared mailbox.
Remove-MailboxPermission -Identity complaint@domainname -User tony@domainname -AccessRights FullAccess
- After removing the permissions, you can delete the shared mailbox that has been shared with you. Go to Account Settings, choose your account and click the remove button.
- Now you need to assign the full access permission permissions again.
Add-MailboxPermission -Identity complaint@domainname -User tony@xyz.com -AccessRights FullAccess -AutoMapping:$false
- Finally, you can add the shared mailbox like a normal account and access its data.
Renaming Outlook Offline Outlook Data File is another option as due to corruption in this file, the synchronization of shared mailbox in Outlook may get affected. So, it is advised to rename the file as it the synchronized local copy of Exchange in the Outlook system drive location and gets recreated automatically when connected with Exchange again.
Navigate to the OST file location – C:\Users\
Go to the .ost file and while renaming it, just add old in the last as old.pst. It would rename the file. Restart the Outlook application and analyze the changes.
Wrapping up
All the above methods should allow you to see your shared mailbox in the Outlook. But, if you are not getting access to a shared mailbox even after following all these methods, then you need to use proper professional migration software specially designed for Office 365 data migration. The professional Office 365 migration software will take care of all the permission levels and migrate all the mailboxes to the desired accounts efficiently.