Summary: The OST files of the Outlook usually saves the data on the local system. It basically keeps the catche mode on. The file location saves the data and the attributes
but at times it becomes important to move the OST file to another location. This blog will help to understand the main process required to change Outlook OST file location using Group Policy.
MS Outlook has been an important email software. It can work in an offline mode as well. You can access your emails and create new emails that will remain in Outbox until the connection is restored. This is possible because it supports the data in OST files.By default, the OST file is saved in the local system at a predefined location-
- C:\Users\AppData\Local\Microsoft\Outlook
- C:\Documents and Settings\Local Settings\Application Data\Microsoft\Outlook
But, there are some recommendations related to the size of OST file that require to change the location of OST file due to its size issues.
- In cached Exchange mode, the size of the offline storage table file is 50 to 80 percent larger than a normal mailbox. The format that Microsoft uses to store offline data is not having a large storage.
- The maximum storage limit of OST file is 50 GB and you should make sure that the drive has sufficient space to keep the data file.
Due to the large size of OST file, you may require extra space to save the new contents and that’s why you require to change the location of OST file to another drive with more storage.
How to change the OST file location in Outlook?
It is not possible to abruptly change the OST File location in Outlook but a Group Policy Template and Office customization tool can help you in changing the location while maintaining the secrecy of the data.
- First, download the Office Customization tool from the following URL location –
https://www.microsoft.com/en-us/download/details.aspx?id=49030 - Click Download option.
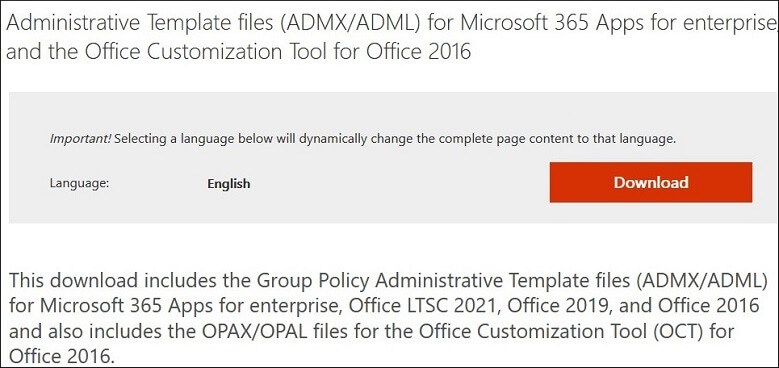
The tool contains the Group Policy Administrative Templates to make the necessary changes in Outlook environment including the location of OST file too.
- Load the Outlook 2019/2016/2013 template in Group Policy.
- Open Group Policy Management Console (GPMC) > Domains > Group Policy Objects.
- Choose the Group Policy Objects that you want to change, right-click and choose Edit. The Group Policy Manager Editor will open.
- In the tree view, open User Configuration.
- Go to Policies and click Administrative Templates.
- Choose Microsoft Outlook 2019/2016/2013, then click Miscellaneous and PST Settings.
- Double-click on the option ‘Default location for OST files.’
- Click Enable.
- There will be a ‘Default location for OST files’ option in which you can input the default location of OST file that we mentioned earlier in the article.
- Click OK.
- Now, you can change the location of OST file from a different drive or folder. It will change the location without making the mailbox inaccessible.
If you do not want to create OST file during upgrade, then you can create another policy too.
- Load the Outlook 2019/2016/2012 template in the group policy.
- Open Group Policy Management Console (GPMC)>> Domains>>Group Policy Objects.
- Right-click on the policy object and click Edit option. The Group Policy Management Editor will open.
- Expand the following folder till Exchange option comes up – User Configuration > Policies > Administrative Templates > Microsoft Outlook 2016 > Account Settings.
- Double click on the option ‘Do not create new OST file on upgrade.’
- Click Enabled to create the group policy setting and click OK.
In Cached Exchange Mode, there are several settings that can help you in managing Outlook better and ensure that the mailbox works properly. Some of the settings are Cached Exchange Mode Sync Settings, Disallow Download Full Items, Disallow Download Headers, Disallow Download Headers Then Full Items, Disallow On Slow Connections Only Download Headers, Download Public Folder Favorites, Download shared non-mail folders, and Use Cached Exchange Mode for new and existing Outlook profile. Let us understand the relevance of these settings one by one:
- Cached Exchange Mode Sync Settings: The software application makes it possible to update the data of 12 months automatically without any issue.
- Disallow Download Headers: It turns off the Download Full Items options for Outlook.
- Disallow Download Headers: This option turns off the download of headers in order to avoid disruption.
- Disallow on Slow Connections only Download Headers: It turns off the On Slow Connections Download Only Headers option in Outlook.
- Download Public Folder Favorites: It synchronizes Public Folder Favorites in Cached Exchange Mode.
- Download shared non-mail folders: It synchronizes shared non-mail folders in the Cached Exchange Mode.
- Use Cached Exchange Mode for new and existing Outlook Profile: It configures new and existing Outlook profiles to add in the Cached Exchange Mode.
Conclusion
Change Outlook OST file location using Group Policy while remaining connected to the mailbox. This can be useful for handling the file transfers of larger size.. But if the OST file is corrupt, then changing the location will not bring the desired results. For a corrupt OST file, you should use a professional OST to PST tool that can recover the items and save them in new data file. This is actually a good idea to get done away with this error.
As soon as the data is recovered from a single or multiple OST file, then you should import it into Outlook to access it.
I applied the above-mentioned method to change the location of my OST file. The method is a little tricky at first, but after carefully following the instructions and continuing, I feel more at ease and confident. You can achieve good results by focusing and applying the method as per the given instructions. Thanks to the entire team for helping to create and share this informative method.
I want to change the profile in Outlook and for the change of existing OST file, I found this blog. It is really informative and elaborates all the steps for all Outlook versions.
The ForcePSTPath Registry Entry method to change OST file location is great but not easy for beginners. But in general, one can also change the OST file location using Microsoft Outlook software application.
Good information for changing the location of OST file because of its big size problems. This article helps you to change OST file location by using group policy. Using these methods, you can obtain a good outcome.