The Offline Storage Table is one of the most commonly used file formats in MS Outlook. It is an encrypted file format. It is one of the most integral file formats of MS .
This is the file format that can be used to access the information in the offline mode. It can store information such as mailboxes, emails, calendars, events, and tasks. However, this file format can never be imported directly to MS Exchange. This file format has to be first converted to the PST file format, and then the same has to be exported to the Live Exchange Server.
Therefore, to export OST to Live Exchange server, it is important to first export the contents of the mailbox, which are stored in the OST files, to the PST file formats using the Import and export wizard of MS Outlook. Users can also use an OST to PST converter, which converts the OST file formats to the PST form, and then the same will be exported to the Liv exchange server. Let us understand the process of the same in detail.
Manual methods
These are methods that the users will be required to perform manually. Let us explore these methods in great detail.
Method 1: Import OST to Live Exchange Server
This is a commonly used step to export the OST file into Live Exchange Server directly. Under this method, the user has to perform two important steps. The first step is to export the OST files into the PST files via the inbuilt mechanism under MS Outlook. The next step is to import the converted PST files into the MS Exchange through the Exchange Admin Center or the Exchange Management Shell.
Step 1: Export OST to PST
Follow the given steps to perform this role of transferring OST to Live Exchange:
- Open your MS Outlook application.
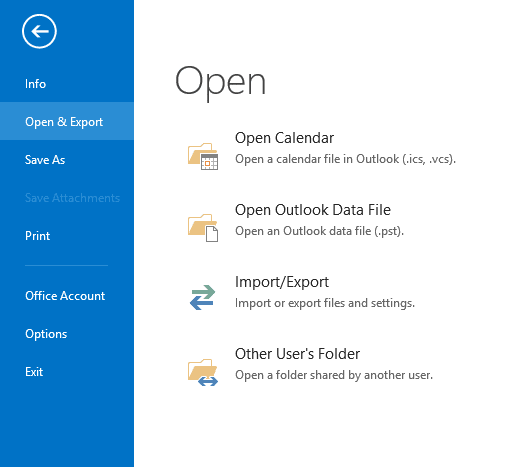
- Go to File and then Open Import & Export. Click on the Import/Export option.
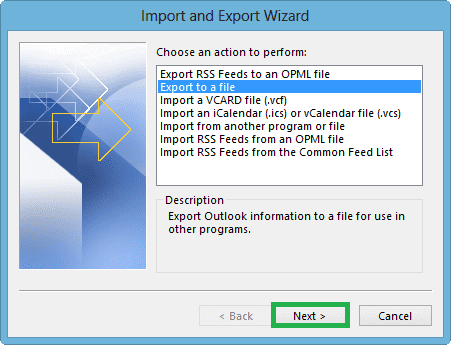
- Then click on Export to a file option. After that, the users will have to click on Next.
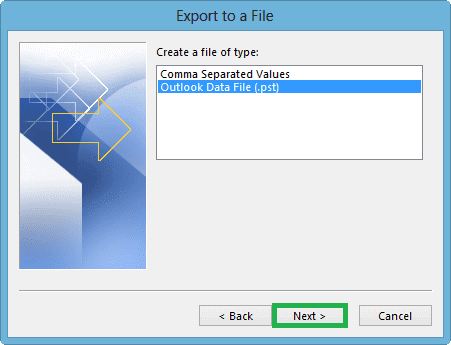
- Now, select the Outlook Data File (.pst) and then click on the next to proceed ahead.
- Select the email folder. The users can also click on the entire profile. Click on include sub-folders option and then click on the next option to proceed ahead.
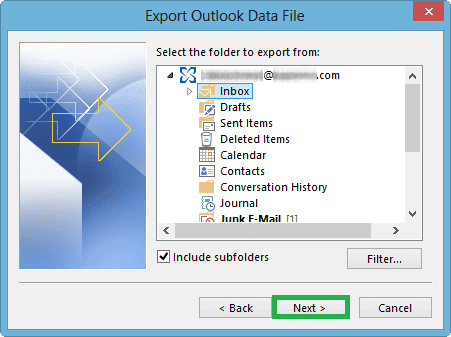
- Click on Browse option. This will help the users to locate the location wherein the users will have to save the PST files.
- After that, the users can click on Replace Duplicate with items imported. Once this process has been finalized, click on the finish option.
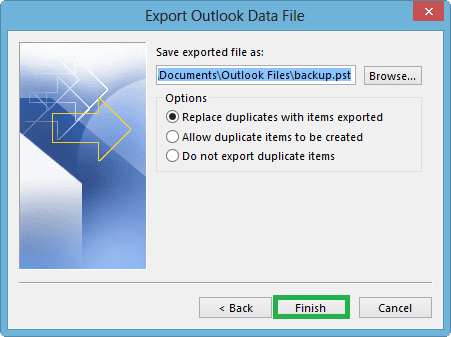
The users will be required to enter a password for protecting the files from any kind of unauthorized access. If the users do not want to protect the files using this method, then they can also click on OK option directly in order to fulfil this requirement. This will be exporting the PST files stored in MS Outlook to the PST files.
Step 2: Import the PST files to Exchange Server
This can happen in two ways, namely through Exchange Admin Center or the Exchange Management Shell.
Let us explore both of these processes one by one:
Through the Exchange Admin Center
Follow the given steps for this:
- Go to recipients in the Exchange Admin Center and click on Mailbox. Click on More options and then Import the PST files.
- The import from a .pst wizard opens. Enter the UNC path and then the filename of the source .pst file. Click on the Next.
- Select the target mailbox and then select any options from Import to this mailbox and Import to this mailbox’s archive.
- Configure the settings and click on the Finish option.
This will shift the OST to Live Exchange.
Through the Exchange Management Shell
The abovementioned steps for the Exchange Admin Center can be followed through the Exchange Management Shell. This will automatically export OST to Live Exchange server. However, these files will be present in a new format of the PST files. The OST files cannot be directly viewed in the Exchange Server.
Method 2: Convert using the OST To PST Converter
This automatic method converts the OST files to the PST file format and then imports them to the Live Exchange Server. This is a professional OST to PST software tool that is used to convert files easily. There is no loss of the data reported so far in this method. It can handle almost every file format and convert one file to another. It is important to note that these files are very dynamic. It is an easy method and does not come with any kind of complication. The users must install a given software to undertake this process. Once the software has been launched, select the relevant files for conversion, and the files will be automatically converted. This will automatically get the files from OST to Live Exchange.
Conclusion
With the help of these methods, it can become feasible to convert files from one method to another. These methods can be followed, and they will help to fulfill the given objective. The users can decide on any of these methods depending on the ultimate purpose of the conversion. They can follow the automatic tool to export OST to Live Exchange Server if they want an easy option and can also decide on the other route if there is a need for the same.