With raging popularity of cloud applications and servers, on-premises email clients and serversare becoming low to go by many businesses and organizations.
The facilities like anywhere data accessibility, profits without application installation, better security, more storage capacity, automatic products update, no data loss risks, no need of external application, integrated collaborative applications,etc. of cloud platform like Microsoft 365 attracts many users and tends themfor data migration further.
Even most of the email clients require to import MBOX to Office 365 platform in addition to the other established email clients like Outlook application. As for any migration and import, special instructions are needed to be followed by the user to choose a good, workable solution in this regard, so here you are welcomed.
This blog is based on the same requirement and on some solutions which could help you to import MBOX to Microsoft 365. Read these solutions carefully and decide on your own.

Recommended: Free Methods to Convert MBOX to PST File free.
Native way to Import MBOX to Office 365
No direct manual solution is available to import MBOX to Microsoft 365. In fact, the only method for this migration is limited to single MBOX email client which is Mozilla Thunderbird. So, it is advised to transfer the MBOX files data from any other MBOX email clients to Thunderbird beforehand. And also, move all the desired emails required for migration to Microsoft 365 to a single mailbox folder in Thunderbird.
Basic Idea
Now, coming to the solution which we are discussing, it involves the two stage processes:
- In the first stage, users would move the Thunderbird emails to PST file folder
- In the second stage, the PST file folder is moved to Outlook for Office 365
Procedure
Thunderbird (MBOX) to Outlook (PST)
- Launch the Mozilla Thunderbird application.
- Click on the desired mailbox folder containing the emails for migration. Now, press Ctrl+A to select all the emails in that folder, right click on the mouse and select the option Save As. Next, add a path location to save all these emails in EML file format.
- Once this is completed, let the Thunderbird email client minimized and then launch the Microsoft Outlook application on the same system.
- Users need to create a new folder in the PST mailbox by right-clicking on the mailbox folder and choosing Create Folder option. Provide any name to it and click on OK.
- Now, select that folder containing the MBOX emails in EML format, then drag and drop it to the Outlook folder just created. If this does not happen, move the EML files from the saved folder individually by the same drag and drop action.
- The EML files are now pasted or saved to the Outlook PST folder location.
Outlook to Office 365
First users must fulfill the following pre-requirements for this stage.
- User must be assigned Mailbox Import Export Role in Exchange Online
- PST must be stored on a network shared folder or file server
- Microsoft Azure AzCopy tool must be installed
- User must be assigned global administrator rights
- Not suitable for moving large volumes of data
Now perform the given steps to import PST file to Office 365 using Network Upload method.
- Login to your Microsoft 365 account and go to Microsoft 365 Admin Center>>Security & Compliance Center>>Data Governance>>Import.
- Next, click on New import job and create a new job by providing a name to it. Click on Next.
- Choose Upload your data option and click on Next.
- On the Import data dialogue box, create the SAS URL copy (combination of network URL for Azure storage location and a Shared Access Signature key for import permission).Download and install the Microsoft Azure AzCopy tool on your system with the provided tool.
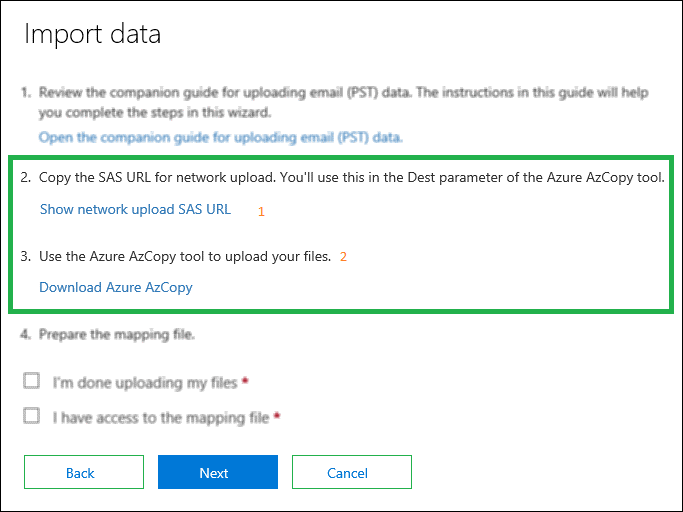
- Now, run the command prompt and open the directory with Azure AzCopy tool installed
- Run this command to upload the PST files.
AzCopy.exe /Source: < Location of PST files > /Dest:< SAS URL > /V:< Log file location > /Y
Note: Provide the PST path location and SAS URL information in the above command.
- Next use a sample CSV file to create mapping between uploaded PST files to Office 365 mailboxes. For that download sample of the PST Import mapping file and edit it as per the requirements within given parameters. Then, click Next to continue.
- Then upload your mapping file, validate it and click on Save option.
- There will be option to filter the data which you choose or not. After this, click on Import Microsoft 365 option to start the process.
- The process will get started and the progress can be viewed. On completion, you will see the Status as completed.
- Thus, converted MBOX emails are now successfully uploaded or imported to the Microsoft 365 account.
Why manual method should be avoided?
Though we have explained the manual solution to import MBOX to Microsoft 365 but we never support this method as many drawbacks are associated with it. For your acknowledgement, we are listing these solutions.
- Supports single MBOX email client Thunderbird while there are more than 20 such email clients.
- Requires technical expertise to use Office 365 account, Thunderbird, Outlook and Azure application.
- Needs multiple email client applications installation on the same system.
- No other mailbox items (contacts, calendars, tasks, meetings) import other than emails.
- Takes much time to process to import MBOX to Office 365.
- Manual errors possibilities resulting into data loss make the process complex
What should be the Next Move?
The next best practice that we recommend you is look out for an automated solution to import MBOX to Microsoft 365 directly with minimum requirements. As there are a lot of products available online, it would be hard to search what you want. To make this task a lot easier, we bring you the most authentic and keenly designed tool, the MBOX to PST Converter tool which widely supports all MBOX email clients for direct import to Microsoft 365 account destination. To understand the user-interface of the tool and the functions involved, here is provided the workflow of tool to import MBOX to Microsoft 365 in steps.
- Start the already installed Converter for MBOX application and choose your MBOX email client from a list of provided email clients. Next click on Select File option to add the MBOX file path location and click on Convert option.
- The scanning process of added MBOX file will get start and after 1-2 minutes, all the MBOX file data will get retrieved. Use preview option to confirm the mailbox folder items content and other details. Select the desired mailbox items and click on Save option.
- Select Office 365 option as saving location, provide the account details and click on Next.
- The saving or import process will get started and soon be completed.
So, within few steps, whole import MBOX to Office 365 is performed and that too with flexibility and full control. After complete description of the tool’s working steps, if you are still not convinced, then it would be the best if you go for its trial version available on its site for zero money and try yourself. That’s it, now move to cloud in the easiest way.
This blog’s native method for importing MBOX to Office 365 is fantastic. When I first read this blog, I thought it was lengthy, but after applying this method step by step, I got a good result. After using these methods, I have a new experience with the manual methods.
I wanted to share my experience with this manual solution. I shifted my MBOX file to Office 365 and with a couple of minutes its all done. I practiced this method three to four times and every time its work really well. Now it’s easier for me to do this conversion task without hurdles.
Every time I used this method to import MBOX file to Office 365 and it was always successful for single small files. I want to recommend this free method to all users because of its excellent performance. Thanks to the team for sharing information.
I used this manual solution as per recommendation of my colleague. In the process of migrating MBOX file to Office 365 this solution helped me really well. It explained all necessary details very clearly.
I tried so many methods and none of them satisfied me, this is the only one which I found the best. This advanced method suggests my idea to import MBOX file in Office 365 safely.
I feel manual process is complex, till I found this method. It’s the only method by which I safely transfer MBOX file into Office 365 account. Thanks for sharing above method.
I want to migrate my MBOX file to Office 365 and used above method for this. As in my experience it is only suitable for migration of small files, otherwise it’s a complex process and only with the help of technical expertise it can be solved.
To migrate MBOX file to Office 365 account I used this tool. I was concerned about my data safety and integrity, but the migration result amazed me. Believe me, this tool converts my all selected data into Office 365 with its original structure. My regards to the team. Thanks a lot.