Summary: Transferring the data from your Outlook account to another device is definitely not a difficult task and does not require much of the efforts. The files on Outlook are stored
in the form of OST and PST. However, if the files become damaged, then it becomes difficult to transfer the data. This blog explains the step by step method to transfer Outlook OST file to a new computer.
An Offline Storage Table (OST file) is the data file created for an Exchange Server account configured in the MS Outlook application. the application also creates an OST file for IMAP, Microsoft 365, and Outlook.com/Hotmail.com accounts. The OST file will save a synchronized version of your mailbox data in a data file on the computer. When the Internet is down and Outlook does not have a proper connection, then it uses an OST file to access the mailbox information. You can write an email and it will remain in your outbox until the Internet is restored again.
The changes will always remain synchronized and there will be no problem with email timings, contact creation, and to-do tasks.
There can be different reasons due to which you will have to transfer Outlook OST file to a new computer. Some of them are given as under:
- Purchasing a new device such as tablet or computer
- Your want to shift your data from a Hosted Server account
- A switch from Windows to Mac is being initiated
- Creating Outlook backups
Know the location of the Outlook OST file
If you had connected your Exchange Server, IMAP, and Office 365 account in Outlook, then you can use the Account Setting and check the data file location.
- Open the Outlook application and click the File option in the ribbon.
- The Info section shows the Account Setting option that you can click and choose Account Settings again.
- In the Account Settings wizard, choose the account whose OST file you want to access. Then, click the Data File tab and choose Open File Location.
- The wizard will redirect you to the Windows Explorer folder where all the OST files are saved.
Now, you can go to the OST file default location, copy and transfer Outlook OST file to a new computer using a transfer medium like Pen Drive, flash drive, etc.
When the Outlook application is not functional or accessible, then you can use Control Panel to access the data files.
- Open Control Panel and click Mail.
- If you click the Data Files button, then it will take you to the Account Settings wizard where you can choose the account and click Open File Location.
The file location will have the OST file that you can copy and transfer to another computer.
Limitations
Even if you can transfer Outlook OST file to a new computer, then you cannot open it manually in Outlook because Outlook supports PST files as an external data file only. It can export and import any user mailbox as a PST file only.
If you want to use the same account with the existing content of the mailbox, then you can export it in a PST file, then transfer that PST file, then import it into the Outlook application.
Export mailbox as a PST file
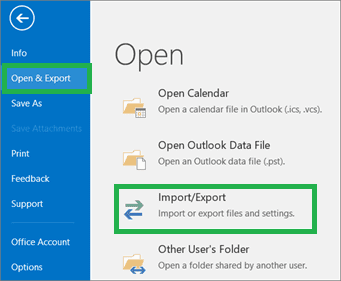
- Open Outlook and click File.
- Go to the Open & Export option, then choose Import/Export.
- From the Import & Export Wizard, Choose ‘Export to a file, then click Next.
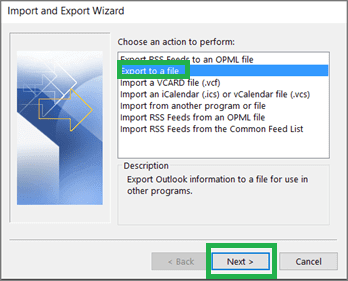
- Choose ‘Outlook Data File (.pst)’ as the file type, then click Next.
- Select the folders that you want to use in the account at a different computer. You can also include subfolders and apply filters, then click Next.

- Choose the Options to handle duplicate items, then click the Browse button to select a destination folder for exported PST files. Click Finish.
After exporting and transferring the PST file, you can import it using the same method as Export.
Import PST file in Outlook
- Open Outlook and click File.
- Click Open & Export, then choose Import/Export.
- Select ‘Import from another program or file.’ Click Next.
- Select Outlook Data File (.pst) as the file type to import. Then, click Next.
- Click Browse to select the PST file, then click OK.
- Click Finish to finalize the import process.
Copy Outlook Data File to a New Computer
Once the mails have been converted from OST to PST Files, one can also copy the converted data and transfer the same to any external storage media. This step can be followed if in case you failed to transfer the data through the Import/Export Wizard. One can use a third party software for this purpose:
- Download the third party software and install the same.
- The software displays the locations of the files which are present therein. You can select the files that you want to convert.
- You can also browse your own location by clicking on ‘Choose Location’
- Select the data file and right click on the same to click on convert.
- Select the converted files and click ‘Save Converted Files. The data would be saved.
Third party tools
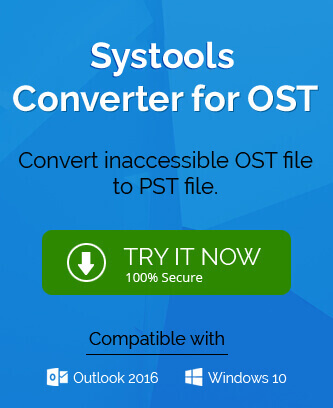
In case, if the Outlook application is not working, then you should use a professional SysTools OST to PST Converter software to convert the OST file into PST format. It will protect and maintain the hierarchy of mailbox folders and help you in accessing contacts, to-do tasks, notes, and calendar information.
Conclusion
A user may require to transfer OST or PST files on a single or multiple devices. Ideally, when you create an account on Outlook, then all the mailbox folders will be generated automatically. But, if you want to access Contacts, Calendars, and to-do tasks, then you should import PST files from the older computer.
This is the best blog on transferring the OST file to a new computer. With the help of these methods, I successfully transferred my OST file to my new system. The blog provided complete information on this subject. Thank you for sharing this blog.
With the help of this blog’s method, I shifted my OST files to a new computer without any issue. The blog shares complete information very well in a simple way. Thank you for sharing this useful blog.
I was trying to transfer my OST file to another computer because my old one was not working properly. When I asked a friend about it, he suggested I read this blog. I read this blog carefully, then I applied the method. Initially, this method looked difficult, but after following the instructions suggested by the author, I was able to transfer my OST file to another computer.
This blog helped me migrate OST files to my new computer. I was looking for a method for solving this problem. My friend suggested this blog. This trick is fantastic and greatly assists me in completing my work. Thanks for sharing this post.
I was having trouble moving my OST files to a new computer, but after searching, I came across this article. This blog has step-by-step instructions that made it easy for me to transfer Outlook OST file to a new computer. Thank you for sharing this article.
I was having trouble moving my OST files to a new computer, but after searching, I came across this article. This blog has step-by-step instructions that made it easy for me to transfer my OST files to a new computer. Thank you for sharing this article.
When I started transferring my MS Outlook OST file to my new computer, I got some issues migrating the files. But after searching, I found this blog, which really helps me to transfer my data. The author has also suggested professional OST to PST Conversion software.
Few days back, I got my new computer from the office and I was worried about to transfer my MS Outlook OST file from old to this new computer. This is the only blog I found helpful, which give me a successful method to share OST file to new one.
This method eased my way to search OST file and then migration in PST file format, so I appropriately migrate it to new computer. A big thanks to Olaf Burch to describe a method so nicely.
It seems difficult if don’t use it before, but I applied this method and easily get satisfactory results. By this method I transfer my OST files to new computer.
I was searching for a satisfied method by which I can transfer my OST file to new computer. And here I found this impeccable method and transfer my OST data to PST format and then new computer.