Outlook PST file can get corrupted due to many reasons like header corruptions, sudden supply off, unexpected shutdown, fault in network, Operating System issue, hard disk failure, anti-virus & firewall interference, faulty Outlook add-ins, storage issue, oversized PST files, etc. PST is the main database file of the Outlook application; its corruption would often lead to Outlook errors and inaccessibility of data which makes Outlook of no use ultimately.
Microsoft Outlook has its in-built utility which users can utilize for repairing their corrupt Outlook PST file. It is named as scanPST.exe which has the ability to repair PST files with minor corruption and of PST file size upto 2 GB only. The default storage location the scanPST.exe application is –
For 64-bit Windows: C:\Program Files (x86)\Microsoft Office\Officexx\
Sometimes this inbuilt tool has to run multiple times to perform the complete repair on the PST file. Otherwise, if it does not help, users can try the suitable third-party software available in the digital market for repairing their respective corrupt files. However, we recommend you this tool available till date in the market.

Recommended: Manual Methods to Repair PST File
How to import repaired PST file into Outlook application?
Assume, now that you have performed the repair of your Outlook PST file either manually or using the ultimate solution on some other system and you have copied that particular file in your system. Now, you want to use that PST file in your Outlook application regularly. For this, you need to import it in your Outlook application. We are going to explain you the manual process to import repaired PST file into Outlook.
Note: You must have copied the repaired PST file in .pst format at your system with the installed Outlook application.
Import Repaired PST File into Outlook
We have divided the PST import procedure in Outlook on the basis of newer and older versions. However, the basic manual PST import procedure is similar apart from some options differences. You can also import Outlook 2010 PST to Outlook 2019, let us understand the PST import process.
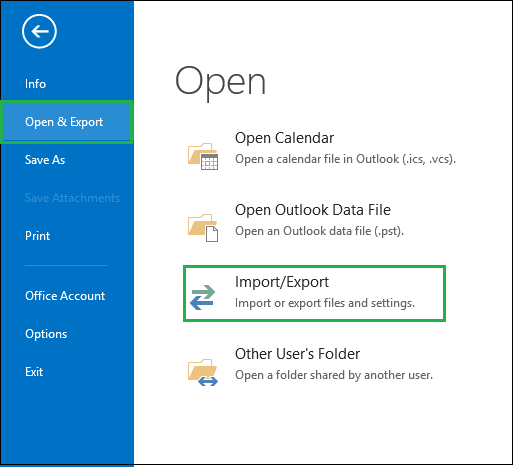
- Start your Microsoft Outlook application. Click on the File tab and then select the Open & Export option from the drop-down. Then click on Import/Export option on the right side.
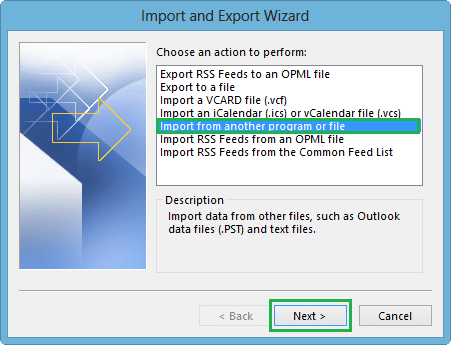
- The Import and Export wizard will be displayed. Here, from the options, select Import from another program or file and click on Next.
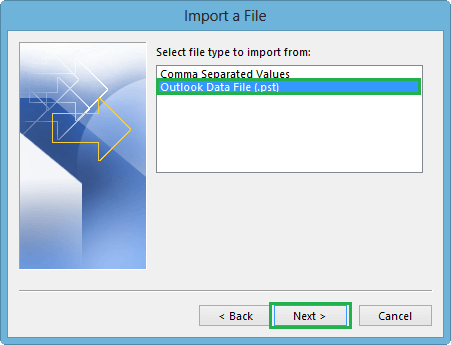
- In the next displayed Export to a file wizard, select Outlook data file (.pst) option and click on Next.
- Now, browse and enter the path location of your repaired PST file. Select one of the options to manage the duplicate items and click on Next.
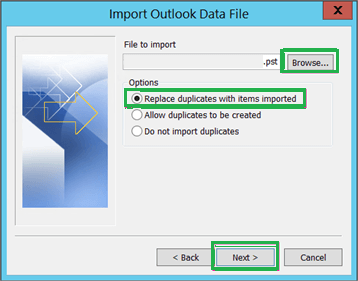
Note: If any password is assigned to your PST file, then a prompt will occur. You need to enter the password and click on OK. - In the Import Outlook Data File wizard, select the checkbox saying Include subfolders, you can select the individual folder or complete mailbox folders with sub folders for import and apply the import options to same folder in different account or to the current folder. After that, click on Finish.
Note: To move the selective PST data, users can click on Filter tab on the same screen.

- The import process will get start and displayed with the progress box.
- The import process will get completed once the progress box disappears.
For Microsoft Outlook 2010
- Run your Outlook application. Go to the File tab, select Open and then click on Import option on the right side.
- Next, perform the same procedure in the previous section for Outlook versions 2013, 2016 and 2019. And import repaired PST file into Outlook application.
For Older Microsoft Outlook versions
- Start your Microsoft Outlook application. Go to File tab and select the Import and Export option. This will open the Import and Export wizard for you.
- Rest, perform the steps as given in the first section to import repaired PST file into Outlook application.
Note: Outlook users have privileges to import any healthy PST file data to all configured email accounts using this advanced Import/Export feature.
So, you have realized that it is quite an easy task to import repaired PST file into Outlook application. But you must have a copy of your actual PST file as a backup as there could be chances of data loss during the import process owing to human errors can lead to incomplete data transfer. The user should know that during this import of PST file all the data like emails, contacts, calendars, attachments, etc. are imported but it does not import folder properties like permissions, views, AutoArchive settings and outlook rules or blocked sender lists, etc. Still, you can, import your highly corrupted PST files being repaired by PST Repair software with these above-mentioned steps in a simple way.
Summing Up
When you are dealing with the corruption in Outlook PST file and have performed the repair through manual help or using third-party software, you got a repaired PST file. This file should be imported to the current active Outlook application on the system for which Outlook integrates the Import feature to add on the PST file data to the Outlook application. And the blog discussed to import repaired PST file into Outlook application via this integrated Import/Export feature.