Users need to re-install Windows owing to different causes like hardware failures, system failure due to virus contamination, deletion/corruption in Windows system files, corruption in Windows registry, broken or damaged setup, latest Windows system upgrades or updates, interrupted Windows installation, blue screen, etc.
Reason could be any but have you also encountered some files or data loss once this re-installation of Windows has been completed? The data loss is natural when the system configurations had asked during the re-installation to choose whether you want to format the hard disk drive and create new partition to save Windows on it or reinstall it to the available disk drive partitions.
The choice of formatting the hard drive would eliminate the data from its (hard drive) location while the other choice also includes risk of data loss if you had not selected the correct partition (on which important data is not stored) to install your Windows.
But you can still recover your lost data due to formatting unless that partition is not overwritten with a new data. We would explain some manual techniques or solutions using which you can recover lost data after reinstalling Windows.
Manual Workarounds to Recover Lost Data after Re-installing Windows
#1. With Windows Backup File History
It is a completely free in-built feature in the Windows Settings which allows you to backup data from your Windows File History. The user must have enabled this feature before to use it for restoring data from files in the backup. To enable it, you can go to Settings>>Update & Security>>Backup. Then click on Add a drive option to create an external drive on the system on which all backup will be created from time to time. You can also configure File History as per your requirements.
Now, let us know how to recover lost data after re-installing Windows using Windows Backup File History feature.
- Go to your PC Settings and open it.
- Click on the Update & Security option.
- On the Update & Security Settings page, click on the Backup option on the left panel. Click on More options under Backup using File History section.

- Select Restore files from a current backup option from the Related settings section.
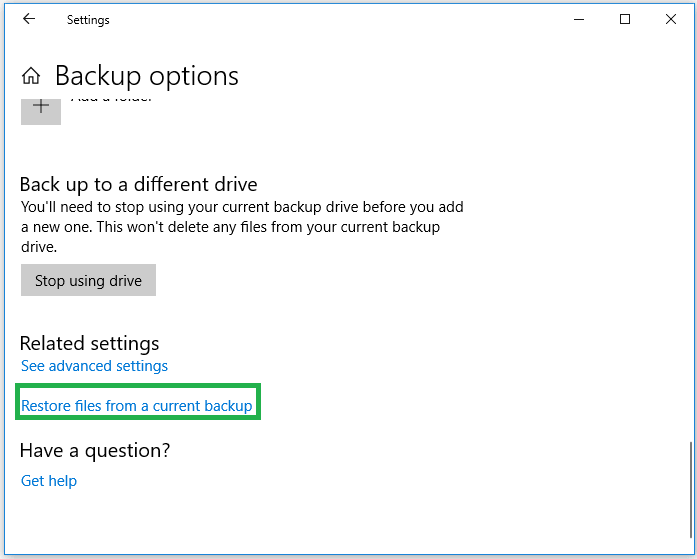
- Next, you can view all the backed up files and folders, select multiple and restore it to its original location by selecting the required version and clicking on Restore option to restore it. However, if you want to save it to a different location, then right-click on the Restore option and click Restore to option. Then provide a new saving location to restore it.
Note: The default settings in File History feature back up folders within your user account folder such as Desktop, Documents, Downloads, Music, Pictures, Videos folders including folder for storing application data, OneDrive folder, only and not other files.
#2. With Windows System Restore
Windows System Restore feature is available in all Windows version and is a free medium to restore the lost data from a pre-defined restoring point. It basically allows users to restore Windows installation to its previous working state which also restores data available at that time. These restore points are generally the snapshots of your Windows system files, program files, registry settings, and hardware drivers and you are required to enable a System Restore point to use it in your hard times for example data loss after re-installing the Windows.
For some systems, this service is enabled by default but for future perspective; make sure it is enabled by clicking on the Start option, typing restore in the search box. Click on the option Create a restore point. On the System Properties page, switch to the System Protection tab, select a system drive (other than C drive) and click on Configure option. Next under Restore Settings section, select Turn on system protection option and click on OK. The restore point would be created.
Note: To use this feature to restore data, user must turn on the System protection and also store backup from restore points on a drive other than your Windows is installed on to.
Now, let us move ahead on the process of restoring lost data from an earlier System Restore Point.
- Reach to the System Properties page (as done in previous steps to create a restore point) or type rstrui.exe in the Windows Run box opened by pressing Windows and R keys together.
- Switch to the System Protection tab and then click on System Restore option.

- On the System Restore page, click on Next to continue.
- Next, you can see restore points. If all points are not visible, select the option saying Show more restore points. You can also use the Scan for affected programs option to scan which will show details about programs and drives which get deleted and restored with this current restore action.
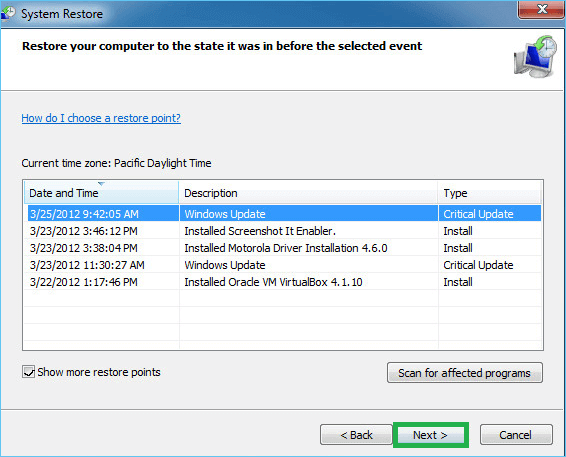
- Once checked, select the required restore point and click on Next.
- Confirm the restore point and saving location. Click on Finish.
- A final warning message would appear. Click Yes to continue.
- The restore would take some time and also creates a new restore point automatically so that you can undo this restore anytime.
The above free in-built Windows features would work only if you have already enabled the features before losing your data and turned ON the system protection. The files lost due to re-installation of Windows can be or cannot be recovered using the above solutions. Hence, there is no certainty or reliability of recovery.
At such condition where data is not successfully recovered after utilizing Windows Backup File History or System Restore facilities, the ultimate solution would be trying a third-party tool.
We would like to suggest you the best tool to recover your lost data due to any reason and from any drive, partition or location conveniently and flawlessly. The Windows Data Recovery tool is designed specifically to scan system drives and partitions to recover the lost data owing to multiple reasons. The software is completely automated and ensures clean, selective recovery within a very short period of time. It works on all Windows Operating System versions and can be tested by users using a free demo version available on its site. The demo version includes some limitations and for full recovery, you need to purchase the full version of the tool. Try this tool once for the best results.
Wrapping Up
We conclude this blog with fulfilling its objective to suggest users the best ways to recover lost data after re-installing Windows which included both professional free data recovery software or manual ways. So, they can make a choice wisely depending on their current situation.