Most of the users upgrade their computer systems from time to time. Sometimes, it is concerned with Windows Operating System version, drivers, programs, software or sometimes it is with the hard drive. They may want a larger hard drive with good storage capacity or new features leading to the more improved performance of the computer system. While this is the users’ progressive point of view for the hard drive upgrade, the other aspect could be damaged computer system with the healthy hard drive left or availability of a cloned hard drive ready for data migration.
In both the conditions, there is an utmost need of crucial data transfer from the old hard drive to the new hard drive on the running computer. We are here to provide you help with certain manual or native ways to move your files from old hard drive to new hard drive explained in this blog. You just have to make a choice to completely upgrade the Windows version with new hard drive or to install a new hard drive on the same computer. That is completely based on your choice and requirement.
Once the decision is made, you can follow on the transfer process by picking up any of the provided manual way in this next section.
Different ways to move files from old hard drive to new drive
There are multiple ways to transfer or move your old drive files, documents, media and other data to a completely new drive on your system. These methods can be performed manually and for free by any of us. Let us know about these feasible solutions one-by-one.
#1. Using In-Built Windows Easy Transfer Tool
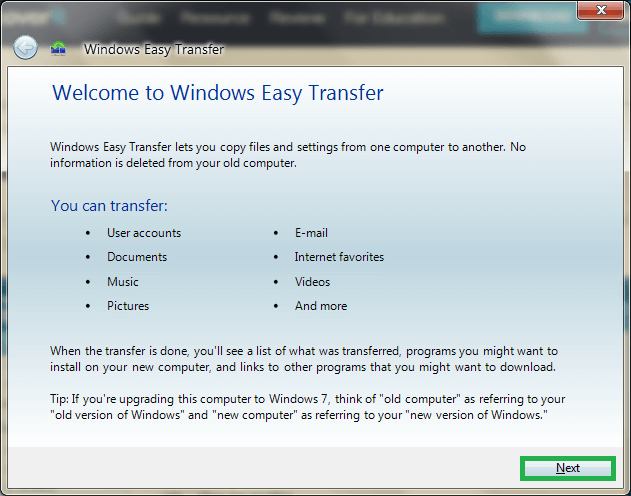
Windows Operating System versions 7, 8 and 8.1 includes an in-built utility “Windows Easy Transfer” allows users to transfer or move files and settings from older Windows Operating System version to a newer Operating System version easily. So, this method is beneficial if you have upgraded to a newer version with a new hard drive installed on it and want to transfer data from the old drive. It can transfer data files and folders, user accounts, settings, windows and application configuration data stored in files, etc. Let us know the steps included in the transfer process via Windows Easy Transfer tool.
- Go to your old computer and search “Windows Easy Transfer” application and open it.
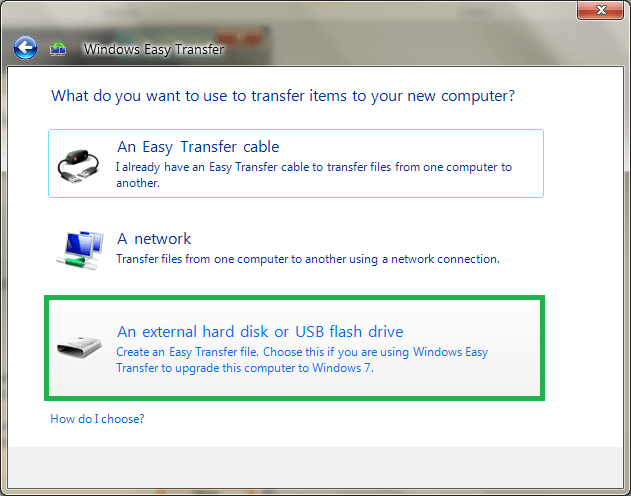
Note: If you are upgrading version on the same computer and installing new hard drive with it, then also you can export this data to an external device using the in-built application. - Click on Next to continue.
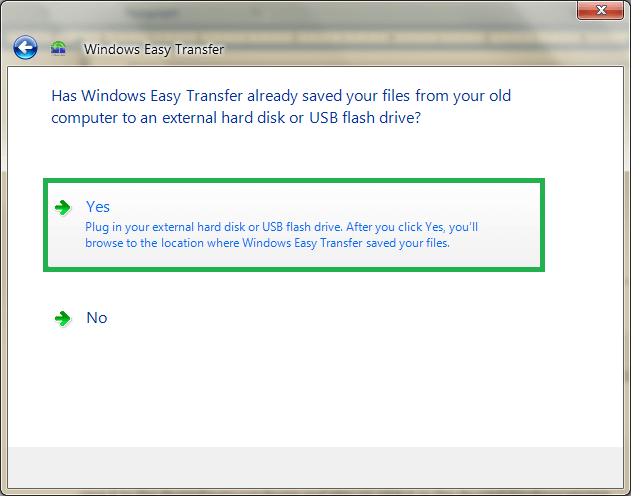
- Choose the option An external hard disk or USB flash drive.
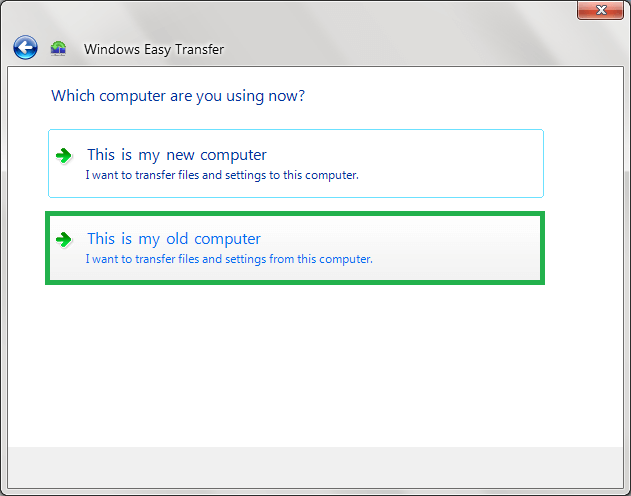
- Next, click on the option This is my old computer.
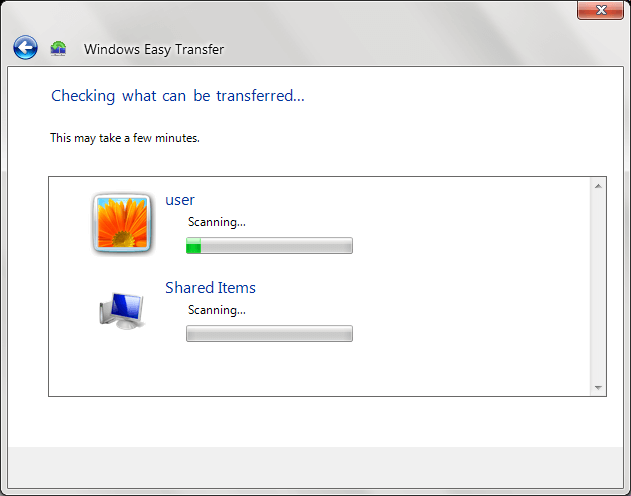
- The tool will start scanning the available data for transfer to external device.
- Once the scan is completed, click Next to continue. You can protect your data with a password (optional). If you do not want to add a password, leave the place blank and click on Save.
- A .MIG transfer file would be created which you contains the old computer data. You can save it to the desired external device and later on save it to the desired Windows version computer using the same Windows Easy Transfer utility.
- On the new hard drive computer, search for “Windows Easy Transfer” tool and choose External device option. After that, click on This is my new computer option. Next, choose the option Yes.
- Plug your external device on the new computer and as the above messages says, it will directly open the folder which contains the transfer file.
- Next, transfer the files from old drive to this new drive in the current computer using this transfer file.
#2. Using Manual Copy/Paste Technique
If your requirement of data transfer size is not more than 30GB, then you can perform the manual copy and paste technique to transfer data from your old drive to the new drive. This is recommended as transferring very large data using copy paste technique would be quite cumbersome for the users. Follow the below-given instructions to perform this method.
- First create a separate drive partition on the new hard drive computer.
- Now, move to the old hard drive (if internal) and copy the desired data from it.
- Now, move to the newly created drive partition on the new hard drive, open it, right-click on the empty space and choose Paste option.
- The pasting process of the selected data will start and takes time according to the data size.
- Hence, the data is transferred from one drive to another using copy/paste technique.
#3. Using Cloud Storage
Users can store their crucial data for transfer to the cloud location from the original hard drive. All the data is now stored online which you can easily download or move to your new Windows version or new hard drive anytime through the cloud account credentials. This is rather a lengthy process involving files downloading and cloud accessibility actions.
#4. Using External Device/Connector
You can simply connect your new hard drive to the old drive using supported external device or connector (USB-to-SATA-IDE adapter/cable). It discards the need of any intermediate drive for the transfer purpose but the user can directly transfer data from the connected old drive to the new drive location owing to these connectors. This method requires good connection and availability of adapters or cable for the functioning.
One more method is to try cloning the old hard drive using a fine cloning tool to move system data and settings while connecting the target drive to the system with original drive. Once cloning is done, users can uninstall the old drive replacing it with the new drive.
Hence, we have explained some of the most feasible manual techniques to move your files from old drive to hard drive successfully. You can choose and try any of the above methods as per your convenience.
For cases, like Windows data corruption which may include files, documents, videos, audios, etc. due to any particular reasons, we offer you the most eligible and proficient Windows Data Recovery tool in advance. It is an efficient professional tool which scans the whole system drives for errors or corruption and repairs all of it then and there. It supports all Windows Operating System versions including the latest Windows 10.
I am always thankful to my colleague which share this important article with me in my need. This article has all information which I need for moving files from old hard drive to new hard drive. The author all the content in details with new tricks and tips. He also recommends for third party tool which can be an optional choice for users.
I analyze this blog and given method impressed me by its functioning. By inbuilt Windows transfer tool utility I shifted files from old hard drive to new hard drive. I followed method steps one by one and reached to the final result. Thanks for sharing such useful methods.
Because I never do this before I am in little stressed about applying the manual method. I used inbuilt Windows easy transfer tool method for moving files from old hard drive to new hard drive. Every step mentioned with a picture so in the process I had no confusion at all and I sent data to new hard drive.
With Windows easy transfer tool method I shift files from old hard drive to new hard drive. Without any problem I shifted these files.