We all love repairing the defective pieces and make it fully functional without having any breakdown. But in case of restoration of Exchange Servers we have to think twice as everyone is not a technology expert to repair it. In such case either the user must have a solution to the issue, or must have technical training to eradicate it.
To begin the restoration process of the Exchange Server database, the user must have direct access to Role-Based Access Control (RBAC). If user plans to restore mail or folders using SMTP, then ensure to configure SMTP server before initiating the process.
Pre-Requirements to Restore Exchange Server
There are some requirements that must be fulfilled before initiating the restoration of the Exchange Mailbox Database:
- In the new Server, the storage groups and databases must pre-exist and must have the same names as in the original Server.
- The destination sever must have the same organization and administrative groups as the source Server.
- To mount the restored database, the destination database must be configured.
- Take a full backup of the Exchange Server database in advance
- Arrange this restoration of MS Exchange mailbox database to a new server in non-working hours/days as the Exchange downtime (non-availability of the server) during the process would hinder business working

Recommended: Try some free methods to convert EDB to PST file.
Restoring Exchange Server 2013 database Leveraging Windows Server Backup
To proceed for recovery of Exchange Server using the Windows Server Backup, it is essential to know that the servers have the capacity to recover, restore and extract the desired mailbox or items. To perform the manual recovery using Windows Server Backup, just follow the DIY instructions:
- In Windows Server Backup, click Recover to initiate the process.

- Choose the location where the backup is stored.

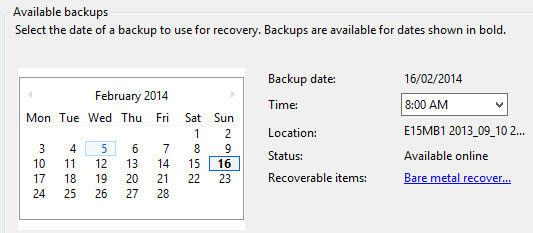
- Choose the backup date and time, if required.
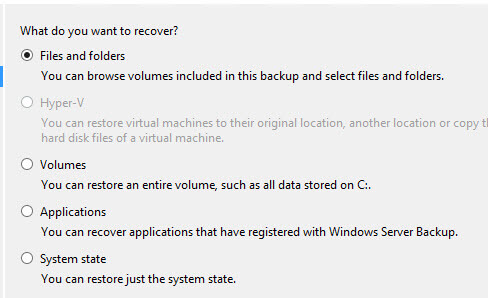
- To recover the entire database, click “Applications”. When recovery database is to be repaired, click “Files and Folders”.
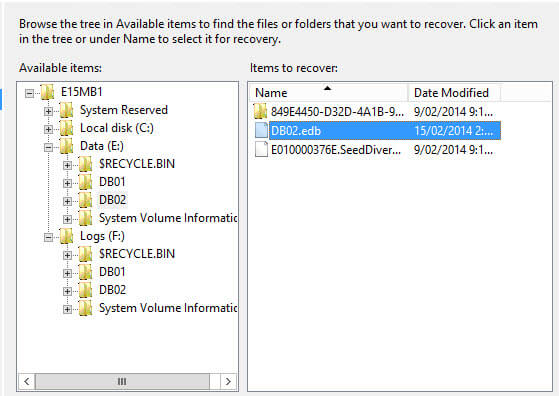
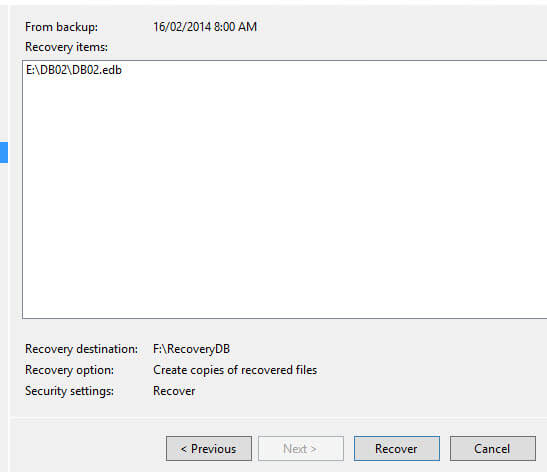
- Browse the items through the tree. Choose the database and log the files you want to restore. In this screen shot, the user is restoring DB02. The restoration of database and logs becomes two different jobs when stored in two different folders.
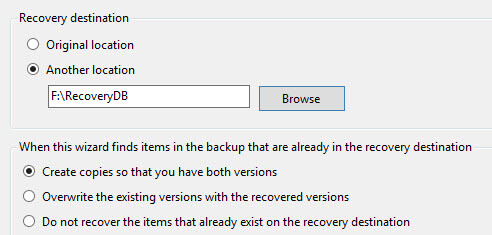
- Choose to restore to Another location and select the folder with enough space.
- Confirm selections and click Recover to initiate the restoration process.
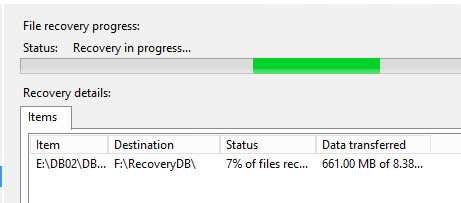
- To view the recovery progress, click the progress window.
- Once recovered, now follow the steps to mount the database.
Mounting the Restored Database
We have just finished the restoration of the database and log files. However, the complete recovery is not finished. If we attempt the mounting at this point, then the restored database files and log files will not work. The reason behind such provocation is that the restored database is in a “dirty shutdown” state.
So, it is required to get the database files in “clean” shutdown state. To mount the restored data, follow these steps:
- Enter Eseutil “soft recovery” command line.
- Once the command is completely run, check the state of the database with Eseutil/mh again.
- If soft recovery doesn’t make the way, then it is recommended to go for hard recovery. It makes the database mounting easy but there is a chance that the data may get loss.
- Now, create the recovery database leveraging NewMailboxDatabase cmdlet with Recovery switch. Here is the syntax for the command.
New-MailboxDatabase -Recovery -Name <RDBName> -Server <Server Name> -EdbFilePath <RDBPathandFileName> -LogFolderPath <LogFilePath>
RDB is Recovery Database.
- Now, you can restart the Exchange store and then mount the recovery database using this command –
Mount-Database <recovery database name>
How about Third-party Solutions?
There are two more ways to restore MS Exchange mailbox database to a new server – using Database Portability and Dial Tone Recovery but these are complex processes and includes certain limitations. The manual recovery and restoration of the Exchange mailbox database is bit tricky for the users who are not introduced to the technical jargons. In such case, it is highly recommended to not attempt the manual restoration. It is advised to go for third-party tool like Exchange Server Recovery tool as it is designed to meet the required standards which are normally beyond the manual process. It performs profound recovery of Exchange database and restores it to new Server and more destinations easily without leaving any Exchange downtime. There is no need to be technocrat to work with tool. Get complete idea of this software from the related online website. You can raise queries regarding it to our support team anytime.
This post helped me for restoring Exchange mailbox data to new server. Blog define every small detail about restoration. Thanks to share important blog.
This information worked for me. Thanks for explaining every essential step. I really appreciate the efforts you have done for making this amazing blog. Keep it up.