Windows Live Mail has been free email client that was available with Windows Essentials 2012. Microsoft replaced it with the Windows Mail app which works almost similar. Most of the users have already migrated to Windows Live Mail alternatives mail clients like Outlook. But some users continue to use this application in their organizations. So, those of you are still using Windows Live Mail to send and receive email, they are likely to come across the Windows Live Mail Error 0x8007007A mostly on Windows 10 systems.
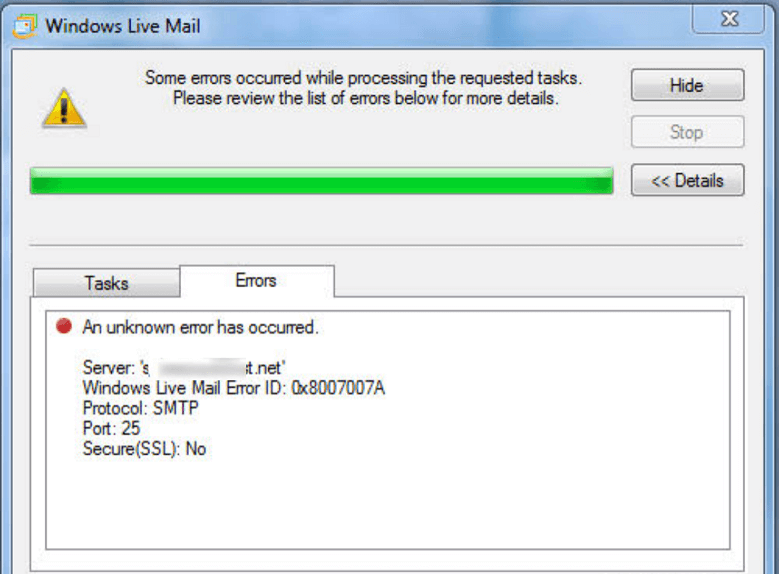
Notably, this 0x8007007A error mostly appears when users try to send simple mail or images from OneDrive, sometimes emails got stuck in your Outbox folder. You will be unable to send it due to a change in OneDrive’s new policy regarding sending albums and pictures via mail. But, you will be able to receive mail properly. Here we discuss some methods to fix this error 0x8007007A.
Reason behind Windows Live Mail Error 0x8007007A
Let us know what can be the reasons for this error to come. This error 0x8007007A usually occurs when users try to send an email with OneDrive media files attached to Windows Live Mail. The latest updates to OneDrive restrict email flow with media attachments because of a confliction between Windows Live Mail and OneDrive. The Images which are loaded from OneDrive cannot be sent to the recipient if attached as an album in an email because of the said confliction between Windows Live mail and OneDrive. To resolve the issue, users may require the following methods.
Method #1: Delete the issuing email
When you want to send a mail from Windows Live Mail, it will stuck in the outbox folder. Due to this, other mail not being sent and shows an error 0x8007007A. The simplest way to solve this error is by deleting the problematic Outbox message. Follow the given steps to fix it –
- Open Windows Live Mail or Windows 10 Mail application.
- Under the Accounts folder on the left hand navigation pane, click the Outbox folder.
- Select the unsent message and delete it. If there is more, then one then delete all messages.
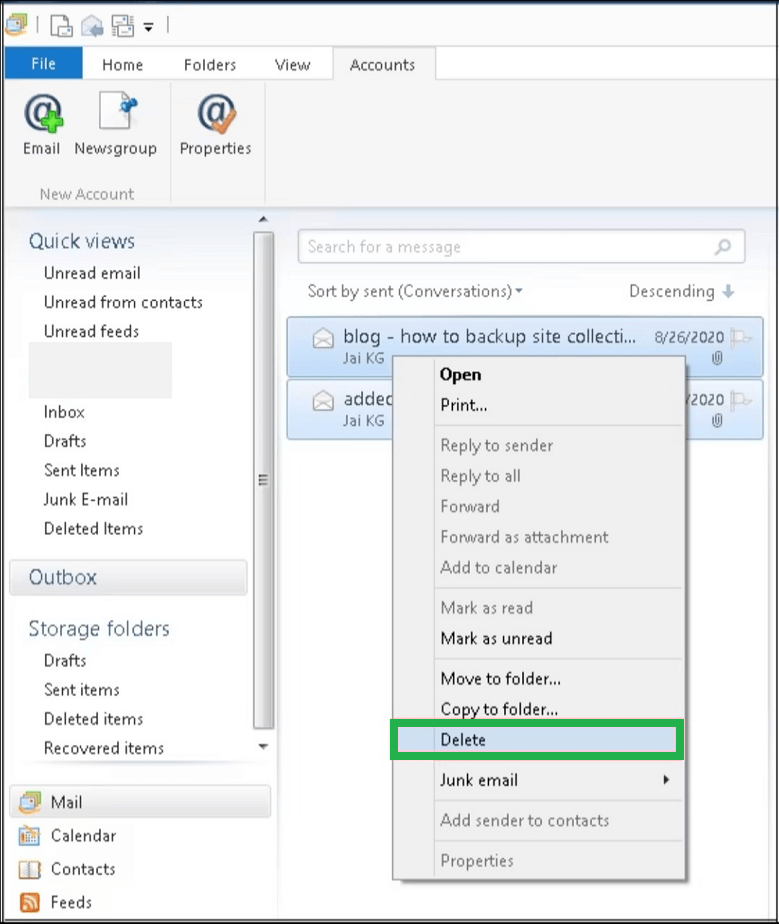
- After that close the application and re-launch it.
- You can send a sample message to your own account for the testing purpose whether problem is fixed or not and see if you are able to do so.
Method #2: Remove and reconfigure Windows Live Mail account
If the manual repair is not successful for you, a corrupted Windows Live Mail account can also be a possible reason for the error 0x8007007A, you can try to delete it and add it again. Keep in mind that it will delete folders, and your account will need to be synced from scratch.
- Open the Windows Live Mail account.
- Click Tools in Menu, and choose the Account name on the left panel.
- Then right click on it and Remove account option.
- Wait until the account is deleted.
- Reconfigure the account, from the menu bar and choose Accounts option.
- Add email account, sign in details then select the option saying Make this my default email account and click on Next.
- At last, click Finish to complete the process.
Method #3: Send the attached pictures without an album
While sending emails with picture attachment, try to send them as attached files like images, and do not select the whole folder as an album. Try the following steps –
- Open Windows Live Mail, and start drafting an email.
- After that, click on Attach file icon.
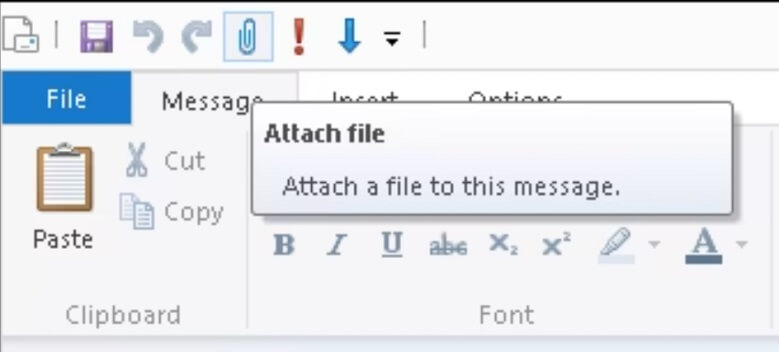
- Then after opening the navigation window choose picture and click Open.
Method #4: Repair the Windows Live Mail application
Still if the error persists even, then we can say that the problem lies in the application itself. There is an inbuilt utility to repair Windows Live Mail program. Let us know the process involved to do it.
- Close the Windows Live Mail, if opened in your computer.
- Open Control Panel in your computer.
- Now, select the Programs and Features option.
- Then go to Windows Essentials program in the Uninstall or change a program section.
- Click on the Uninstall/Change option.
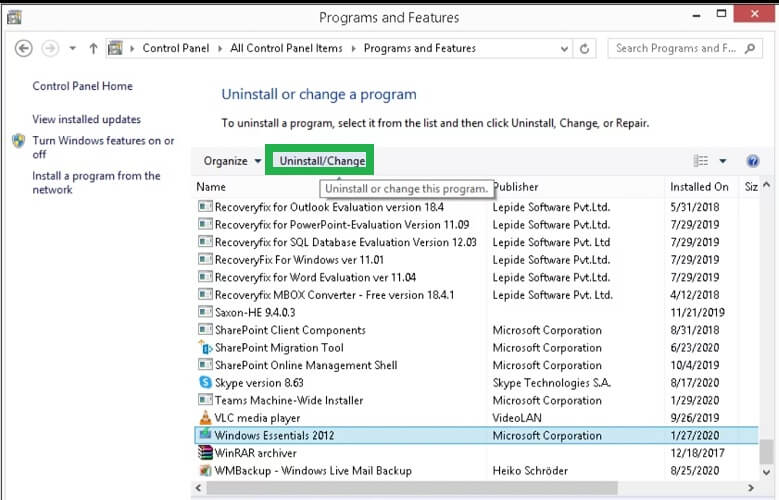
- Now, click Yes to confirm.
- Click on the option Select Repair all Windows Live programs.
- Wait until the repair process is complete.
- Once the repair is completed, restart the computer.
- At last, open the Windows Live Mail application and try sending an email.
Many Windows Live Mail users tend to migrate their email to Microsoft Outlook and to move current data stored in EML files to Outlook compatible PST file format, the efficient and reliable EML to PST Converter tool is recommended.
Summary
Windows Live Mail error 0x8007007A can occur at any time, and many also occur due to incompatibility of applications with other applications such as OneDrive. After describing some manual solutions to fix the error, we have discussed the trend of migration from Windows Live Mail to Outlook nowadays and the need for a powerful third party tool.

When I was running Windows Live Mail and trying to send emails, then error 0x8007007A displayed on screen. This method guides me and helped in resolving this error.
It’s a useful blog helps me in resolving Windows Live Mail error 0x8007007A. I went through the steps given to delete this error. Thanks for helping with these manual methods.
It’s a useful blog to solve error 0x8007007A manual in Windows Live Mail. When I was in trouble because of this error, then this method saved me.
I used this method to fix Windows Live Mail error 0x8007007A and it helped me throughout the process. Thanks for sharing this blog.
I take many hints from this blog to solve Windows Live Mail error 0x8007007A. It guides me in every step, to this all thanks to the creator.
To repair Windows Live Mail error 0x8007007A this blog method really helped me, I got great results after applying. Every error related information clearly elaborated.
Thanks for this supportive blog which helped me to vanish error 0x8007007A in Windows Live Mail. I suggested my friends this method and I got positive feedback from them.
While using Windows Live Mail 0x8007007A is a common error, occurs many times. To eliminate this error I used above method and actually I got relief. After that whenever this error occurs, I solve the error all by myself with this method.
I got stuck in between work when I faced error 0x8007007A in Windows Live Mail. To settle this error I used above method and delete issuing email from mailbox. It works for me, thanks for sharing this blog.
When error 0x8007007A occurs in Windows Live Mail and I was not able to send messages, then it was the only blog which helps me readily. Methods are elaborated properly and guide me to solve this error.
It happens many times when I faced error 0x8007007A in Windows Live Mail and with this given method I defeated this error. The above manual solution is described in easy technical language step by step.
I was in trouble because I want to send an email attached One drive file to Windows Live Mail and because of this error 0x8007007A I couldn’t do so. I am thankful to these blog methods which helped me really well to overcome from this problem.
Sometimes I faced error 0x8007007A while using Windows Live Mail on Windows 10. It was really frustrating sometimes when I was working. Thanks to the writer of this blog who helped me to solve this error.
To eliminate Windows Live Mail error 0x8007007A, this perfect method helped me a lot. Every step for removing this error is clearly described. Thanks for sharing.
I faced this error 0x8007007A many times and every time I resolved it with this method guidance. Thanks for sharing this unique method. It always helps me to go through this type of error.
Blog method has described with a really good approach to solve error 0x8007007A through all possible ways. I was facing this error and with these methods I handle this error wisely. Now Windows Live Mail is working properly.
For a long time I am using Windows Live Mail and I faced error 0x8007007A many times. And a big thanks to this blog writer, which helped me to came out from this huge trouble. After diminishing this error I am in relief and able to send and receive long attachments mails immediately.
This topic cleared my confusion and helped me to fix this issue. I was confused because receiving emails properly and during sending emails, It prompts error 0x8007007A and email got stuck in the Outbox. Helpful article.