Most organizations work s with both Mac and Windows environment at a divided scale while most of them share s a single working environment (Operating System) at a time. So, at times, due to existing business requirements or direct switch to other environment of company, current Outlook for Mac users may require moving OLM to Outlook PST file format.
Common Reasons to Import OLM to Outlook
- Need to Outlook for Mac OLM files back up on Windows environment
- Migration to another organization with Windows environment
- Switch from Mac to Windows PC within the same organization
- Compliance requirements of the organization
- Different physical locations for Windows and Mac environment of the same organization’s users
- Sharing OLM database content to Microsoft Outlook users
For example, Outlook for Mac data is stored in OLM files which do not work in the Windows environment. “The file < path >.olm is not an Outlook data file (.pst)”. Users who try to access OLM files in Outlook application would encounter this error: To access Mac OLM emails to Outlook, the conversion of OLM file to PST file format is needed which can be performed with an approved reliable professional best OLM to PST utility. Although there is a manual trick also to import OLM to Outlook destination which we want to share with our Outlook users and like them to go through it once.

Recommended: Free Methods to Convert OLM to PST File
Ways to Import OLM to Outlook 2019/2016/2013
Via Gmail IMAP Configuration
In this method, with Gmail IMAP configuration as a medium between Outlook for Mac and Microsoft Outlook email clients, we are going to import OLM to Outlook.
Users can export or archive OLM data (Mails, Contacts, Calendar, Notes and Tasks) to the desired destination location using the Export feature in the Tools section of the Outlook for Mac application.
Let us know the important points to execute this method.
Note: This method is applicable to Outlook 2019/2016/2013 versions.
- Go to your Outlook for Mac application and navigate to Tools>>Accounts.
- Click + icon under Add account option and the provide details like
User name, password (Gmail account)
Incoming server: imap.gmail.com, SSL, 143 (port number)
Outgoing server: smtp.gmail.com, SSL 465Click on Add account option after all details entered and confirmed.
- The account connection will soon build up along with the synchronization process.
- Once the configured Gmail account is visible, create a Gmail label within IMAP settings of Gmail account to move OLM data to Gmail IMAP mailbox.
- Then start migrating data from OLM files to the added Gmail account with drag/drop option or using Move>Choose Folder option after right-clicking the mailbox folder to be moved to the Gmail mailbox.
- Next, with all data transferred in a separate folder Gmail mailbox, now configure it in the Outlook application.
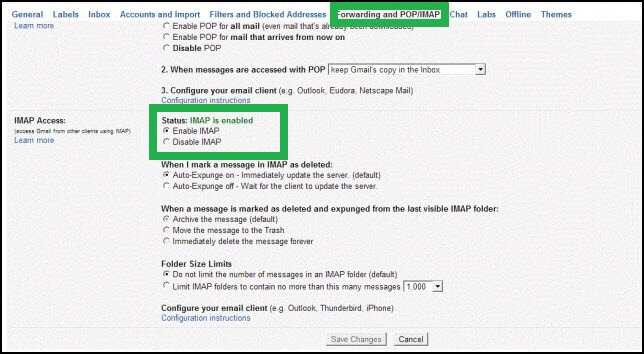
Note: Please note that Enable IMAP option under is selected before Gmail configuration in Outlook or Outlook for Mac. You can find this option within Settings feature of your signed in Gmail account. Move to the Forwarding and POP/IMAP tab and under IMAP Access section, select Enable IMAP (if not selected earlier) option as shown below.
- In the Outlook application, Go to the Account Settings feature and add this Gmail account as done earlier in Outlook for Mac email client.
- In the Outlook application, click on Send/Receive feature to refresh the sync. The data is available now in the configured Gmail account with IMAP server in the Outlook application which user can access and then drag the selective folders or items to the already opened or added Outlook PST file.
What are the results?
Though you have achieved success to import OLM to Outlook application, but it is not always secured. Many a times, the user makes certain mistakes which causes interruptions in the process which could be due to the complex and technical nature of the process. And the bulk emails migration is also not entertained with the above approach as it would take much time which is enough to lead some files to the corruption state. Data integrity after the import is also not ensured. Working with two email clients on different environments is also a little tough and risky.
However, there is a way to avoid all these limitations and confusions, which is a one-time purchase of an authentic, reliable tool which is a perfect platform to import OLM to Outlook 2019, 2016, 2013 and older versions. It is equipped with such advanced features like preview, saving options, filters etc. to customize the task of migration. Bulk migration is also a facility here. The whole conversion does not require presence of any email client but only OLM files.
To be clear about the software interface and function, we have provided you a brief description in steps. Download and install the tool from the authorized website to follow these steps.
Working steps of the Software
- Start the OLM to PST Converter tool. Click on Browse option to add the OLM file which location is known. Otherwise choose Find option and check for OLM file in the drive. Click on Convert then.
- The scanning and conversion process will start progressing and take some time for completion. After very less time, the whole converted OLM mailbox data is retrieved. Here, you can select an item for preview which could be emails, contacts, calendars, etc.
- Click on Save Converted Mailbox option at the top and then choose PST as the saving option.
- You have two options – either save to existing PST file or create a new PST file. Make your choice and then add the desired information. At the end, provide the destination location for the converted PST file. Click on Save.
- The saving process will get start and complete within very short time.
- Thus, Outlook Mac data is easily moved to Microsoft Outlook application.
The best part of this tool is independency of any email client for the functioning. Everything is simple and with the flow. Just try this tool once on your own and get the results which you desire.
End Words
Switching email clients due to difference in working environments needs data migration as well like the import OLM to Office 365 and import OLM to Outlook. No manual solution, even Gmail IMAP configuration guarantee risk free import, instead an automated provision proves a great requirement with all-over advantage points and features.

I am really inspired by this blog which helps me to import OLM emails to Outlook smoothly. The manual method is described with step by step process and I just followed these steps. The given tricks make my way easier to import OLM emails to PST format. Thanks for giving this useful method.
As per my experience the method are really trustable, to import Mac OLM emails to Outlook I used it and get finest results. Writer elaborate method so nicely and I only followed steps and reached to my expected result. Thanks for sharing.
It was courageous to do a manual conversion for importing Mac OLM emails to Windows Outlook. In conversion process available method helped me a lot in every stage. Thanks for sharing above method.
This method was really useful in importing OLM emails to MS Outlook. I applied this method and gives me relieve after seeing results.
I used Gmail IMAP Configuration method which was the only way for importingway Outlook for Mac OLM files to Outlook for Windows environment. Step by step, I went through the entire process and accomplished email data to Outlook for Windows PC. Thanks a lot.
Thanks for mentioning this blog here, I was looking for a easy manual solution from a very long time. After applying this method, I get satisfactory result. Therefore, Thanks a lot for this blog
Because of this blog, I am able to import Mac OLM mailbox data to Outlook without any third party paid software. Thanks for providing such an informational blog. Keep it up