In this help blog, you will be going to learn the native method of migrating resource room and equipment mailboxes to Office 365 account mailboxes. As you should know what resource mailboxes are, let us recall the definition once again to start with.
The resource room and equipment mailboxes are the mailboxes in association with the Active Directory account. By default, these mailboxes remain in disabled state. Sometimes, during On-premises Exchange to Office 365 migration, users like to move room and equipment mailboxes to cloud also.
Note: The Resource Mailboxes can be created using the Exchange Admin Center through Recipients>Resources navigation within it.
For those users, we have come up a solution with use of the Exchange Online PowerShell.

The migration of Resource room and equipment mailboxes to Office 365 can be performed in two stages.
1st Stage – Enabling Resource Room and Equipment Mailboxes in Active Directory
2nd Stage – Migrating Enabled Resource Room and Equipment Mailboxes with Exchange Online PowerShell
Enabling Resource Room and Equipment Mailboxes in Active Directory
As we know the resource room and equipment mailboxes are disabled in Active Directory by default, so we need to enable it first for the migration. Only the Exchange Administrator or the user with administrator rights can use Active Directory for modifications. So, get the permissions if you have not one and after that follow this procedure.
- At the Exchange system, start the Exchange Domain Controller.
- Here, search for Active Directory and User Computers option on the left page and expand it.
- Then click on Users option. Here, find out the resource mailboxes (room and equipment mailboxes), right-click on it and select the Properties option.
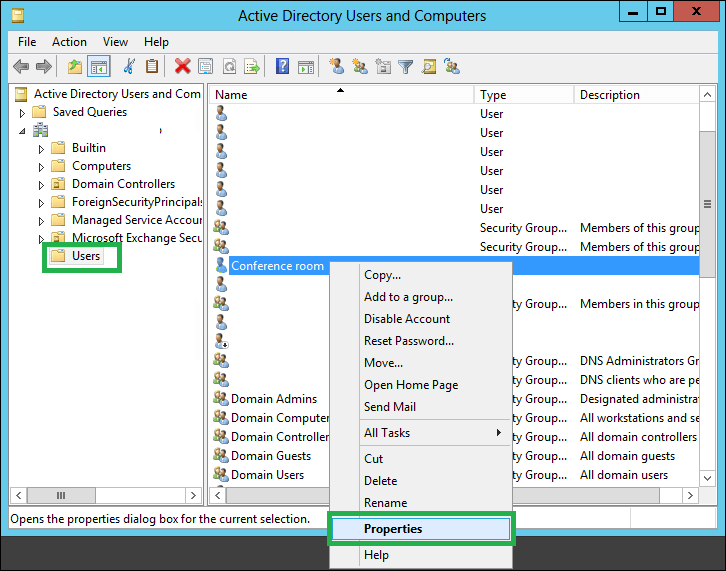
- The Properties dialogue box will get open. Switch to the Account tab and move to the Account is disabled checkbox. Unselect this checkbox, click Apply to apply this setting. Finally click OK and Close to get out of this window.

- Hence, the resource room and equipment mailboxes are enabled.
Migrating Enabled Resource Room and Equipment Mailboxes with Exchange Online PowerShell
Once the resource mailboxes are enabled, it is feasible now to perform the migration. You can utilize the Windows PowerShell application in your system to perform the migration, For that, first connection of Office 365 account in PowerShell is required. Let us know the whole process of migration via Exchange Online PowerShell in sequence here,
- Search for the Windows PowerShell application on your system, right-click on it and select Run as administrator option.
- The application will get open. To connect Office 365 account in PowerShell, run these commands one-by-one.
Execute this first command.Set-ExecutionPolicy RemoteSignedThis command is required to run only once on a system as a setting.
Next, run this command for the connection$UserCredential = Get-CredentialAs the output of this command, you will get the prompt to enter your Office 365 account login details. Provide it and click on OK.
Next these two commands one-by-one to establish the connection and other migration settings.$SESSION = New-PSSession -ConfigurationName Microsoft.Exchange -ConnectionUri https://ps.outlook.com/powershell -Credential $UserCredential -Authentication Basic –AllowRedirection
Import-PSSession $SESSIONAfter this above last command, the Office 365 account will get successfully connected in the PowerShell.
- Run this command to start the migration process of resource mailboxes to Office 365.
New-MoveRequest -Identity <Account Name> -Remote -RemoteHostName <hybridserver.domainname.com> -TargetDeliveryDomain <domainname.mail.onmicrosoft.com> -RemoteCredential $UserCredential
In the above command, enter the account name, hybrid server email address with domain name and Office 365 account email address with domain name in place of <Account Name>, <hybridserver.domainname.com> and <domainname.mail.onmicrosoft.com> respectively.
- You can wait for the migration process for completion or view the progress with a move request through this command.
Get-MoveRequest | Get-MoveRequestStatistics
Once the migration is finished, you need to remove this move request using this command.
Get-MoveRequest | Get-MoveRequestStatistics - The migration from resource room and equipment mailboxes to Office 365 is completed.
There is a new method to migrate resource mailboxes to Exchange Online which is via the Exchange Admin Center. It is recommended in this new method to not enable the resource mailboxes before starting the process. Follow the process.
- Login to your Exchange Online account with the administrator credentials.
- Open the Exchange Admin Center from the Admin Centers section.
- Navigate to Migration>New>Migrate to Exchange Online.
- Then select Remote Move Migration option. Click Add (plus icon) to add the Resource mailbox for migration.
- Follow the procedure of migration as described further until the migration status is successful.
Hardships in above method
It is fortunate that a manual method is available for the resource mailboxes to Office 365 migration but is it feasible for all? The answer is No. As only the Exchange administrator or the user under his training and rights can perform this migration because direct access to Active Directory of Exchange system is not allowed to all. Also, executing these technical commands needs expert hands and for the wrong execution, the costs could be high. So, we can consider this method is limited for expert users and also includes no provision for specific data migration.
The new method is also a tricky one as the accurate Exchange Online and On-premises synchronization is required and there is a complexity involved in the availability of Resources mailboxes during the migration.
Final Solution
If you are desiring a migration with full control without any need of access and permissions, then try the most convincing and robust Exchange Migration tool. It serves users with all kind of migrations, even resource room and equipment mailboxes to Office 365 easily. It requires only Exchange Server login details along with Office 365 account credentials. Moreover, it supports all versions and provides selective data migration with advanced filter options. You can get completed knowledge about the tool at its website page and also try the trial version for the first experience.
Above blog has proved method to migrate resource room and equipment to Office 365. I used this method and shifted resource room to Office 365.
I shifted these resource room and equipment mailboxes to Office 365 with the above manual methods. They are easy for small mailboxes with experts. And for large files, it is really complex, it’s not wrong if I say impossible.
This manual solution easier my way to migrate resource room and equipment mailboxes to Office 365. Thanks for sharing this effortless solution.
For a long time I searched for a method to transfer resource room and equipment mailboxes to Office 365. And with this perfect method my search ends and I shifted my equipment mailboxes to cloud one by one. It takes time, but I was happy to see results.